
Build
Pickaxe MCP Server
Connect Claude Code, Codex, Cursor, or VS Code straight to your workspace — your agents, documents, and users become tools your AI client can call.
Connect Claude Code, Codex, Cursor, VS Code, or any other MCP client straight to your Pickaxe workspace. Your agents, documents, users, and access groups become tools your AI client can use — no local install, no custom integration code.
What is the Pickaxe MCP Server?
MCP (Model Context Protocol) is the standard way AI clients discover and call outside tools. The Pickaxe MCP Server puts your whole workspace behind that standard: point a client at one address, authenticate with a key, and every Pickaxe Workspace API operation shows up as a tool the client can call.
There's a single address for everyone:
https://mcp.pickaxe.co
The workspace comes from your key, not from the URL — so the key you authenticate with is what decides which workspace the client is working in.
It's a hosted HTTP server, so there's nothing to install or keep running. If your client speaks MCP over HTTP, it can talk to Pickaxe.
Setting it up
If your MCP client supports OAuth, add https://mcp.pickaxe.co without an API-key header, then sign in to Pickaxe when prompted and review the requested permissions. You can still use the key-based setup below.
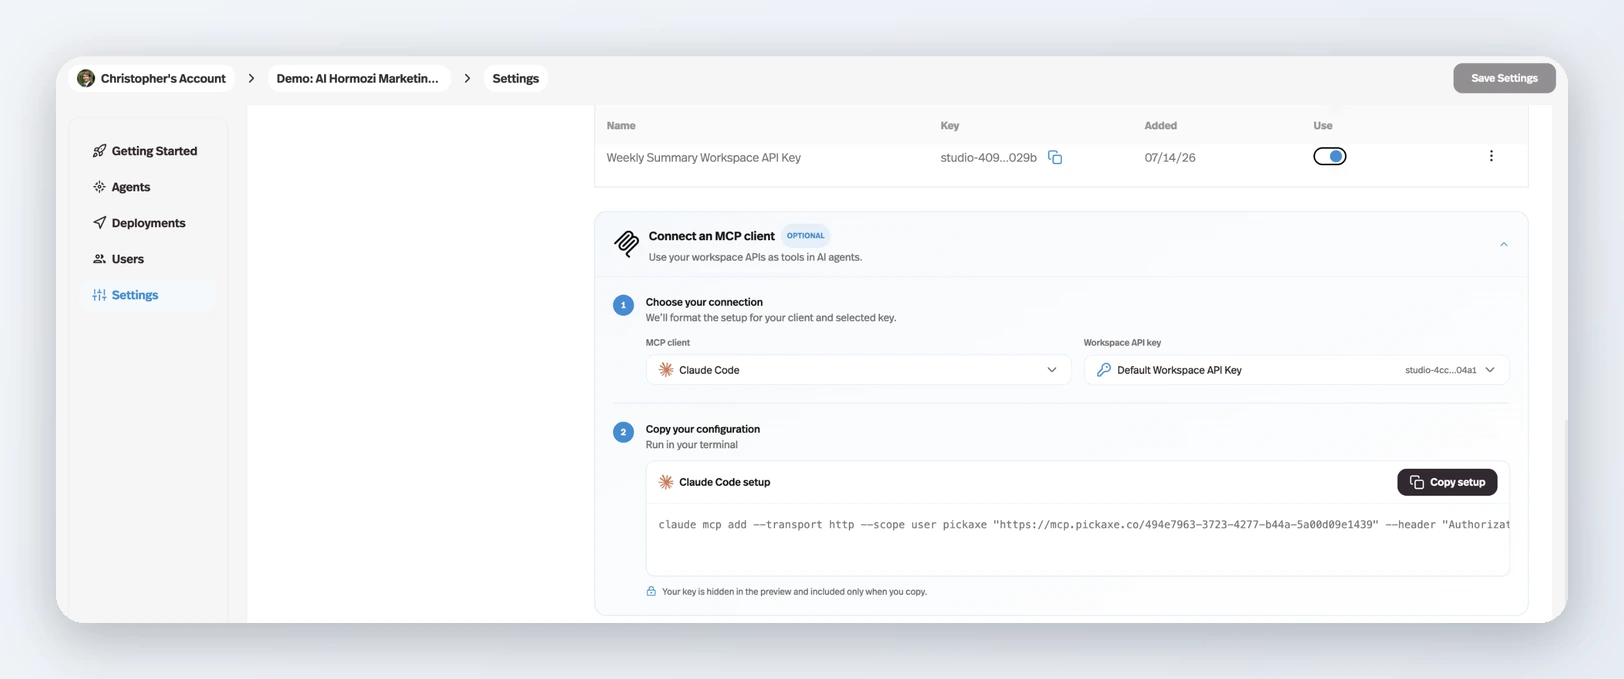
Go to your workspace, open Settings, and find the Workspace API Keys section. Underneath the key table you'll see a panel called Connect an MCP client. Expand it and you get a two-step setup.
1. Choose your connection. Pick your MCP client and the Workspace API key you want it to use. Only keys with the Use toggle switched on appear in the list — if the dropdown says "No enabled API key," enable one (or hit Create to make a new one) first.
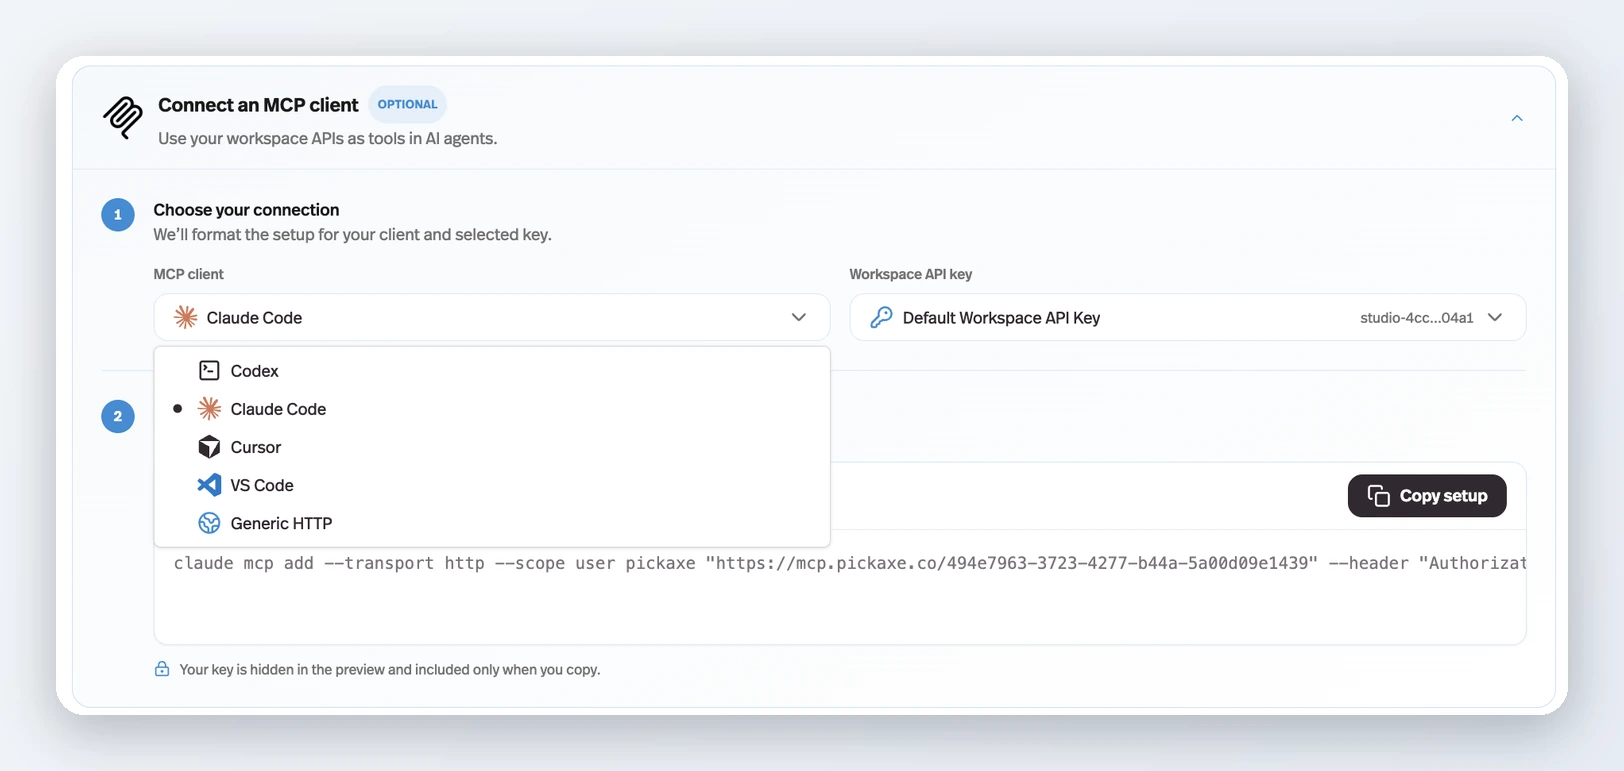
Pickaxe formats the setup for five options:
| Client | Where the config goes |
|---|---|
| Codex | ~/.codex/config.toml |
| Claude Code | Run the command in your terminal |
| Cursor | ~/.cursor/mcp.json |
| VS Code | your VS Code mcp.json |
| Generic HTTP | any other MCP-capable client |
2. Copy your configuration. The panel writes the whole snippet for you — server URL, headers, and all. Hit Copy setup and paste it where your client expects it.
For Claude Code, that's a single terminal command:
claude mcp add --transport http --scope user pickaxe "https://mcp.pickaxe.co" --header "Authorization: Bearer YOUR_WORKSPACE_API_KEY"
For a JSON-configured client like Cursor, it looks like this:
{
  "mcpServers": {
    "pickaxe": {
      "url": "https://mcp.pickaxe.co",
      "headers": { "Authorization": "Bearer YOUR_WORKSPACE_API_KEY" }
    }
  }
}
One detail worth knowing: your key is hidden in the on-screen preview and only included when you copy. The panel is safe to screen-share; the clipboard is not.
Which key to authenticate with
The address is the same for everyone; the key decides what the client can reach.
| Key | Reaches | Get it from |
|---|---|---|
| Workspace API Key | One workspace | Settings → General → Workspace API Keys |
| Personal API Key | Every workspace you own or belong to | Account Settings → Personal API Keys |
| Deployment token | One agent, via its API/MCP deployment | The agent's API/MCP deployment |
A Workspace API Key is the right default — it's what the setup panel hands you, and one entry per workspace. Reach for a Personal API Key when a single client works across several workspaces, and a deployment token when someone should only be able to run one agent.
What your AI client can do
Once connected, your client can see and act on everything the Workspace API covers:
- Agents — list them, read their configuration, create new ones, update prompts, and kick off builds
- Knowledge base — upload documents, connect and disconnect them from agents, update or delete them
- Deployments — list, update, and delete deployments, including Meeting Bot sessions and calendar connections
- Users — create users, look them up, update or remove them, and check scheduled follow-ups
- Memory — read, write, and clear workspace memories and per-user memories
- Access Groups — create groups, assign and remove users, preview a deletion before committing to it
- Portals and Pages — create and restyle portals, manage pages and portal links
- Actions — list available actions and their runs, connect and disconnect them
- Models and products — list the models available to your workspace and the products configured on it
That's the same surface area the Pickaxe CLI and Wingman work through — the MCP Server just hands it to your own AI client directly.
Running an agent from your MCP client
Alongside the API tools there's one purpose-built tool: run_pickaxe_completion.
Give it an agent's ID and a message, and it runs that agent and returns the response. The useful part is what it doesn't require — the agent does not need an API/MCP deployment. Any agent in the workspace can be run this way, which makes it easy to have your coding agent test a prompt change, spot-check an answer, or chain a Pickaxe agent into a larger workflow without deploying anything first.
You can pass a message, structured inputs, a user ID, a conversation ID, image URLs, and metadata — the same shape as a normal completion request.
How access is scoped
The MCP Server checks three things on every request:
- The credential is one Pickaxe issued — a Workspace API Key, a Personal API Key, or a deployment token. OAuth access tokens are deliberately not accepted here.
- The credential is still live. Flipping a Workspace API Key's Use toggle off, or revoking a Personal API Key, cuts the connection immediately.
- The target belongs to a workspace that credential can reach. Asking
run_pickaxe_completionto run an agent outside that reach fails.
Since the workspace comes from the key rather than the URL, the credential you hand a client is the boundary — which is why a Personal API Key, reaching every workspace you belong to, only belongs in a client you'd trust with your whole account.
Any of these keys is powerful — it can create, modify, and delete real workspace data. Treat one like a password: keep it out of shared repos and screenshots, give different tools their own keys so you can revoke one without breaking the rest, and turn a key off the moment you're done with it.
MCP Server, CLI, or Wingman?
All three drive the same workspace. Pick based on where you want to be working:
- MCP Server — you already work in Claude Code, Codex, Cursor, or VS Code and want Pickaxe available as tools in that client, next to everything else it can do.
- Pickaxe CLI — you want a coding agent to pull your workspace down locally, work on files, and push changes back.
- Wingman — you'd rather not leave Pickaxe at all. It's the same power, one click away inside your workspace.
Plenty of builders use more than one. They don't conflict.
Learn more
The full list of operations, request bodies, and examples lives in the Pickaxe API documentation — every endpoint there is a tool on the MCP Server.