This is our canonical guide to Pickaxe. If you're getting started with Pickaxe, we recommend reading it from top to bottom. If you'd rather watch something, you can check out this quick-start video on building your first Pickaxe agent.
Pickaxe is a no-code, self-serve platform for creating AI agents, sharing them with users, and monetizing them with paywalls and usage limits. If you want to build AI tools for yourself, your company, your clients, or your customers, Pickaxe is a simple place to do it. We'll cover every part of that process in this guide.
You can also ask our Pickaxe Doorman any questions. He's an AI chatbot trained on this guide and many other Pickaxe materials. Talking with the Doorman is often faster than reading static text. You can also check out our Frequently Asked Questions page. If you'd rather hire someone to build your agents for you, you can always get help directly using Custom Support.
A note on terminology: if you've been around Pickaxe for a while, you'll notice that what we used to call "Pickaxes" are now called agents, and what we used to call "Studios" are now called Portals. Pickaxe is still the platform — agents are the AI tools you build on it, and Portals are the branded hubs you serve them through. You may still see the older terms in some videos and forum posts; the concepts haven't changed, just the names.
Let's go through Pickaxe, piece by piece.
How to build an agent
Forms vs Chatbots
An agent is an AI tool built on top of an LLM (like one of OpenAI's GPT models, Anthropic's Claude models, or Google's Gemini models). On top of the underlying model's out-of-the-box capability, you can write special instructions in the form of a prompt, give it special knowledge by uploading your own data, and even connect it to other software and APIs via Actions.
You can build two different types of agents: Chatbots and Forms. The principles are very similar, but the end-user-facing experience is a little different.
A Chatbot is pretty self-explanatory. It's a conversation box where the end-user types whatever they want. When they send a message, the chatbot responds. It's an open-ended, back-and-forth conversation with no definite end, much like ChatGPT.
A Form is a series of input fields. These can include text input fields, multiple-choice fields, file upload fields, and more. Once a user hits "submit," the prompt runs using the inputs the user provided, and the output is displayed. Forms can even be configured so the output automatically opens up in a chat. Chatbots are the most popular type of agent, but some builders prefer Forms because the input is more structured.
The difference between a Chatbot and a Form mostly lives in the experience of the end-user. The experience of building a Form or a Chatbot is very similar.

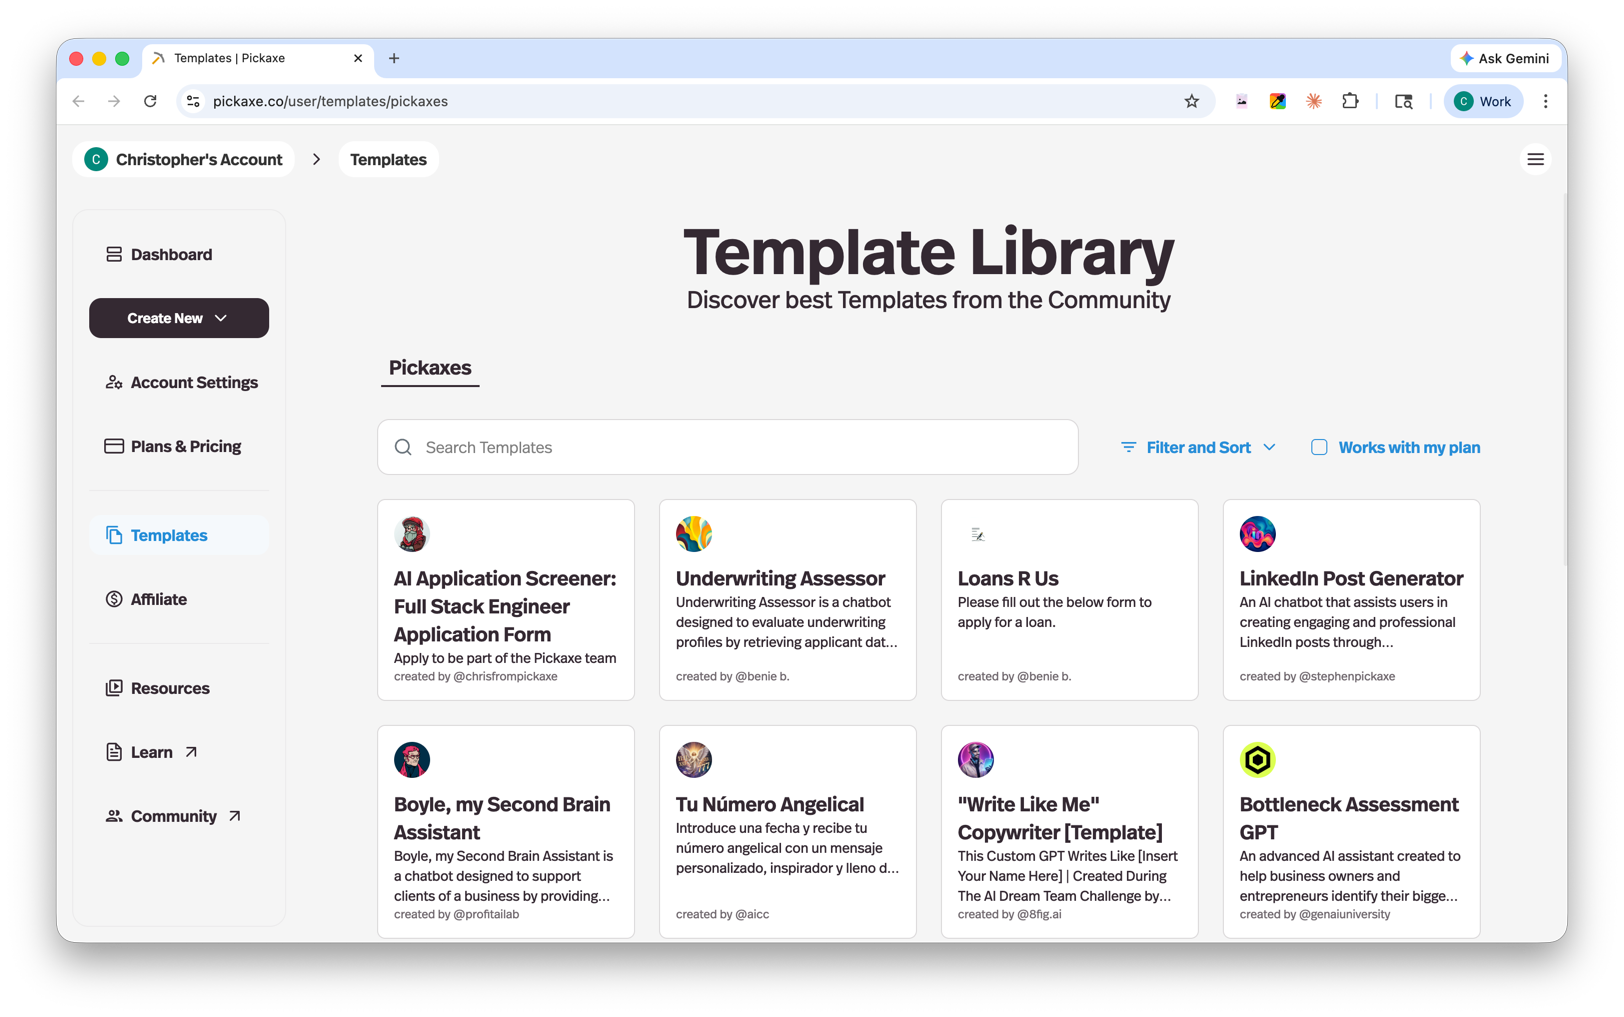
You can also browse the Template Library to start from a pre-built template instead of building from scratch.
For a deeper dive on writing the instructions that power your agent, see our guide on the anatomy of a good prompt.
The Agent Builder
The Agent Builder is where you create and configure agents. It's organized into three main tabs across the top: the AI Helper, the Editor, and the Preview. You can move between these tabs at any time.

AI Helper
The AI Helper is the fastest way to create an agent. Just describe what you want to build and it will walk you through every step of setting it up, testing it, and refining it. It can even help you configure Actions.
This is a great starting point if you're new to Pickaxe or to AI in general. Just keep the conversation going until your agent is ready.
As it works, the AI Helper shows you every change it plans to make before applying it. That also makes it a handy way to learn where specific settings live inside the Editor if you want to fine-tune things yourself later.
Editor
The Editor gives you direct control over every aspect of your agent's configuration. It's organized into four sub-tabs: Prompt, Configure, Knowledge, and Actions.
Preview
The Preview tab lets you test your agent and see exactly how it responds in a live conversation. You can also select a specific user to impersonate, which is useful for testing how your agent behaves for different users or different access levels.
The combination of Editor and Preview lets you rapidly build and test in a quick iterative loop — make a change in the Editor, then jump to the Preview to instantly see its effect.
The Prompt tab
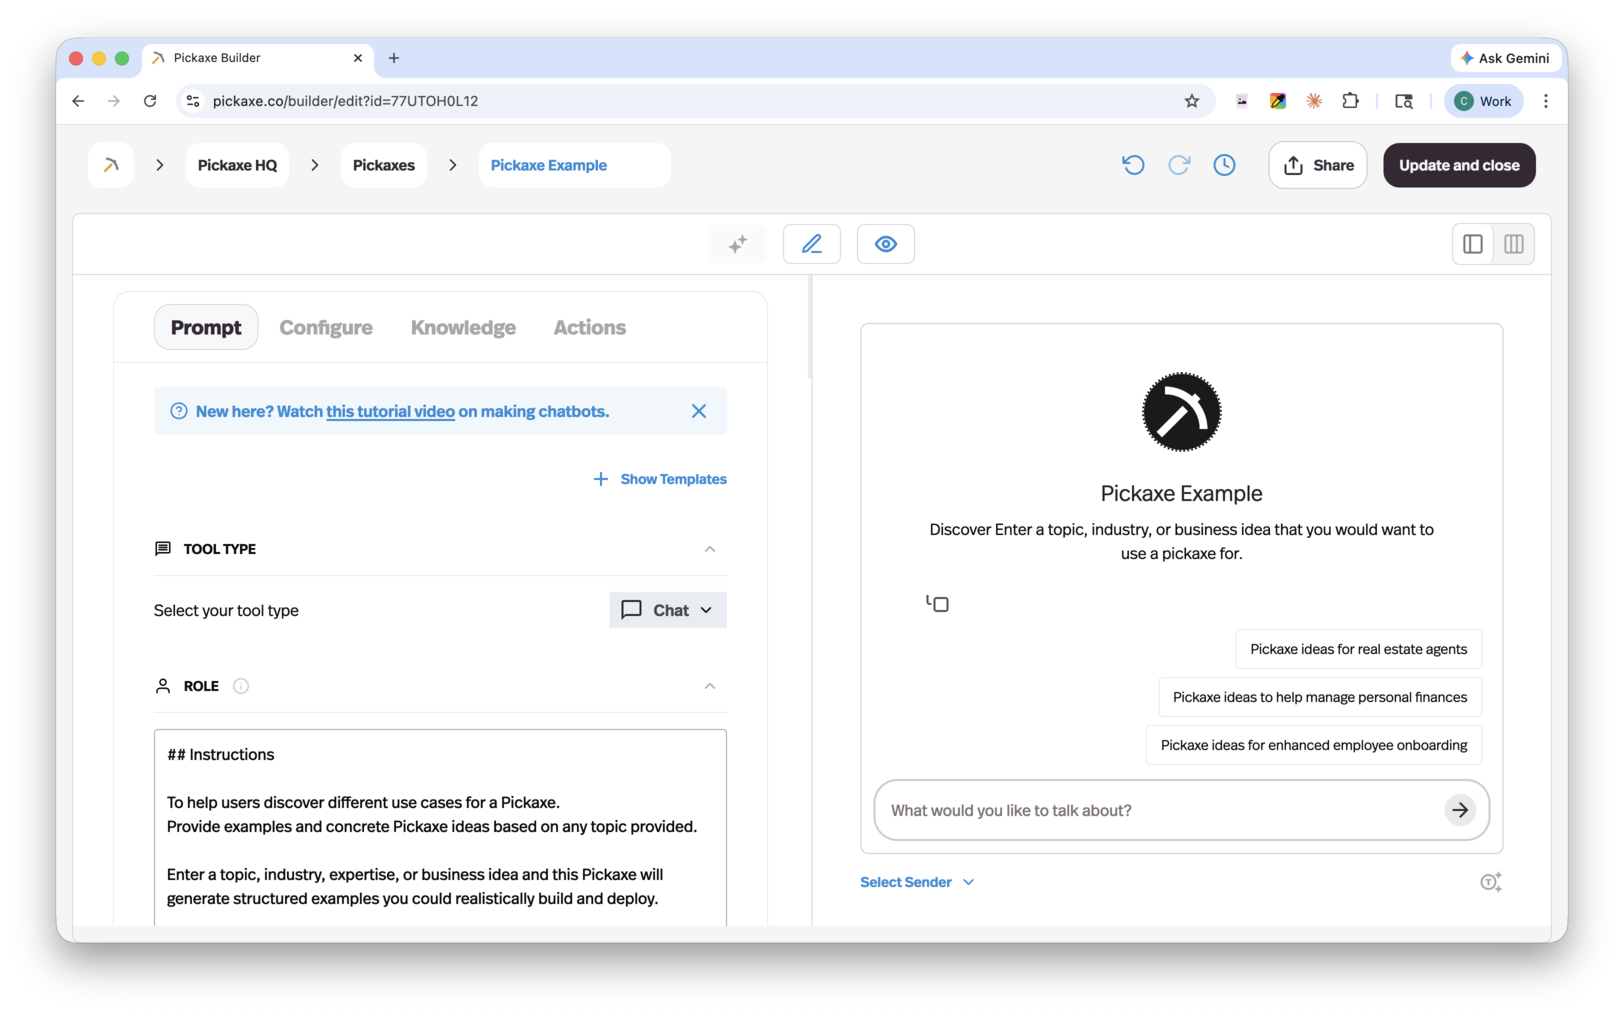
The Prompt tab is where you define how your agent thinks and behaves. It contains several sections.
Tool type — Choose whether your agent is a Chatbot or a Form.
Role — This is your main prompt. It's the core set of instructions that tells the AI who it is, what it does, and how it should respond. Prompting is the practice of writing instructions for an AI in normal language. The best advice is to be clear and explicit about what you want the AI to do. If your agent is a Form, an additional Prompt Frame section appears, giving you a dedicated space to manage how form inputs are handled.
AI Model — Choose the LLM model that powers your agent. One of the biggest benefits of Pickaxe is that you're not locked into a single model. Some are cheaper, some are smarter, and some are better suited for actions or for following specific styles of writing. Pick the one that fits your use case, and switch at any time.
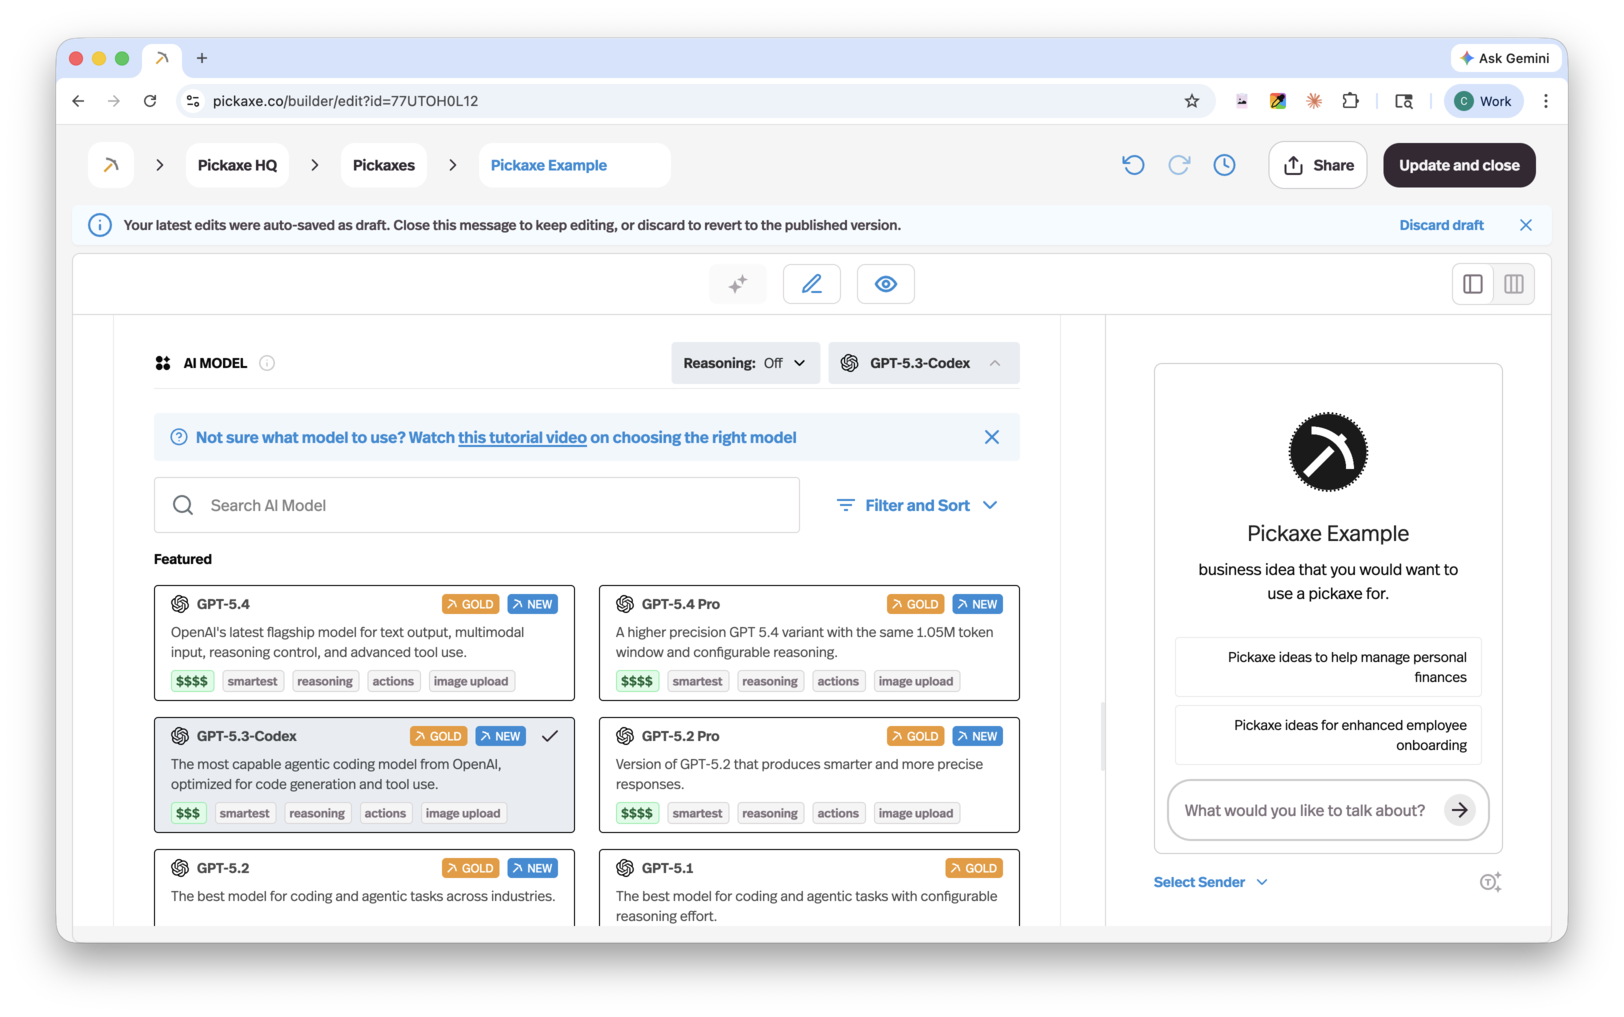
If you don't have a strong opinion, the default selection is a smart, fast, capable model that works well for most use cases. You should only change the model if you have a specific reason or want to experiment. Many copywriters who care about prose style, for example, prefer Claude.
Capabilities — A set of toggles that turn on extra features for your agent (covered in detail below).
Instructions — Configure how your agent greets users:
- Intro Message — A pre-set greeting that appears when a user opens the chatbot.
- Ice Breakers — Sample user messages your agent will suggest to help the user start a conversation.
Model Reminder — A consistent instruction that is prepended to every user message. Use this to reinforce important rules or behaviors that the AI should always follow. Only the AI sees this message — your users will not.
Here's a video tutorial about the Chatbot builder.
Here's a video tutorial about the Form builder.
Capabilities
Capabilities are toggles that add extra functionality to your agent without any coding. You'll find them in the Prompt tab.
- Allow users to upload files — Adds a paperclip icon so end-users can drop in documents during a conversation.
- Allow users to hear responses — Generates audio playback of the agent's replies.
- Allow users to use voice input — Lets users speak instead of type.
- Display reasoning steps — Shows the thinking the AI does before answering.
- Image generation — Lets your agent create images, with a selector for the image generation model to use.
- Copilot for users — Adds an in-conversation copilot to help your users create content, tools, or snippets.
End-user file upload: When this is on, end-users can upload text-based files (Word docs, PDFs, .txt files, spreadsheets, and more) into a chatbot. These uploads only last for a single session — they don't persist across sessions. If an end-user uploads their resume into your chatbot and then refreshes a new conversation, the agent won't remember the resume. When a file is small enough to fit in the conversation, its contents are dumped directly into the message. If it's too big, it's converted into vector embeddings and accessed via retrieval throughout the conversation.
Image recognition: If an end-user uploads an image, your agent can understand it as long as you're using a vision-capable model. Make sure end-user upload is enabled. Here's a video tutorial about building an agent with image recognition.
Image generation: When this toggle is on, your agent can generate images when it deems it appropriate. For example, if you turn image generation on for a copywriter chatbot, it probably won't generate images in most outputs unless the user specifically asks for one. You can always add instructions to your Role prompt about when and when not to generate images — agents are quite good at following these directions. You can also connect additional image models like DALL-E through the Actions tab.
The Configure tab
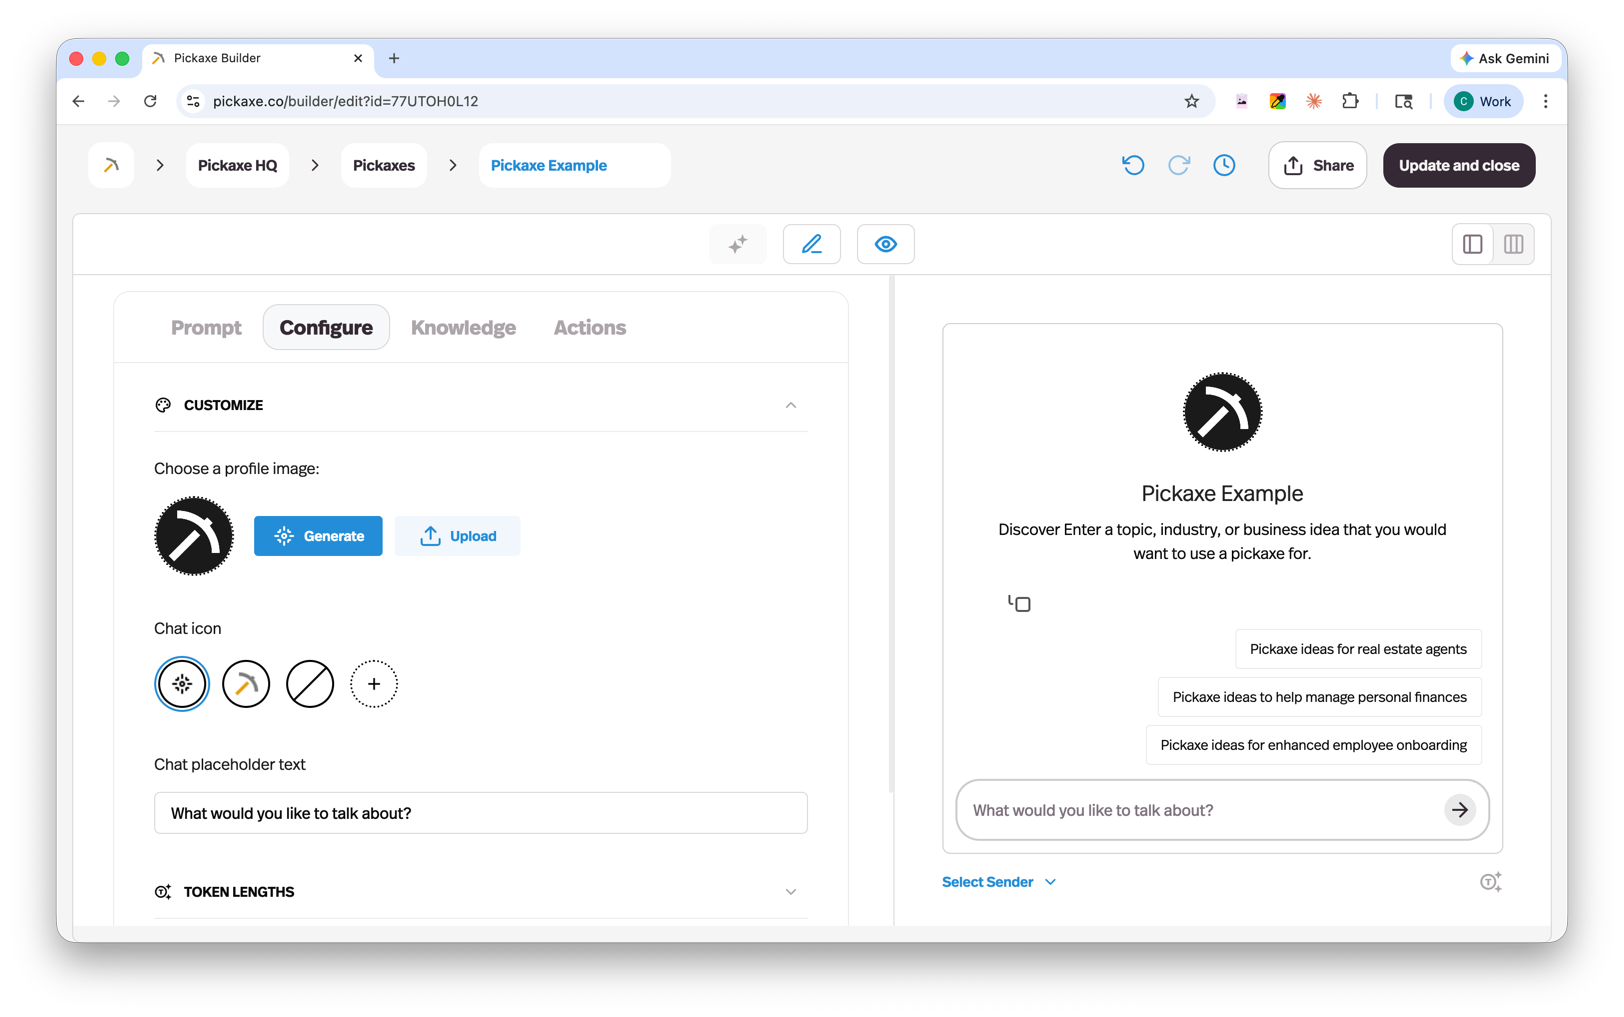
The Configure tab lets you customize the appearance and resource allocation of your agent.
- Logo — Set a custom logo for your agent.
- Placeholder text — Customize the input placeholder users see in the chat box.
- Token allocation — View a breakdown of your token budget and control how resources are distributed across inputs, outputs, and context.
Waterfall Allocation is the order in which tokens are allocated inside your agent's context window:
- Memory fills first.
- Spillover goes to End-User Docs.
- Knowledge Base gets the remainder.
The default settings work for most standard use cases. You'll mostly visit the Configure tab when you want to brand the look of your agent or fine-tune token settings.
The Knowledge Base
How does the Knowledge Base work?
The Knowledge Base lets you give your agents context that would normally be too large for an AI model to read in one go. Your agent uses it to inform its answers. The Knowledge Base is a RAG (Retrieval Augmented Generation) system. When you upload a file, Pickaxe breaks it into small uniform chunks, turns those into vector embeddings, and stores them for fast semantic search.
Importantly, your agent does not read or memorize the entire document every time it answers. Instead, when an end-user sends a message, the system scans all stored chunks, scores them based on relevance, and selects only the most relevant ones — usually just a few paragraphs. Those chunks are inserted into the agent's context so it can answer accurately and efficiently. In other words, you can upload millions of words into the Knowledge Base, and your agent will only look at the most relevant few thousand each time it answers a question.
For more on this, see our deeper write-up on enhancing your experience with the Pickaxe Knowledge Base.
Workspace-level vs agent-level Knowledge Base
There are two places to manage knowledge in Pickaxe, each with a different purpose:
- The Knowledge Base tab in your workspace dashboard manages knowledge across your entire workspace. Upload files once and reuse them across multiple agents.
- The Knowledge tab inside the Agent Builder manages knowledge for one specific agent.
Files uploaded at the workspace level are available to any agent in your workspace, but they aren't automatically attached to one. You choose which knowledge each agent has access to. This gives you flexibility: build a shared library at the workspace level, then pick and choose what each agent needs.
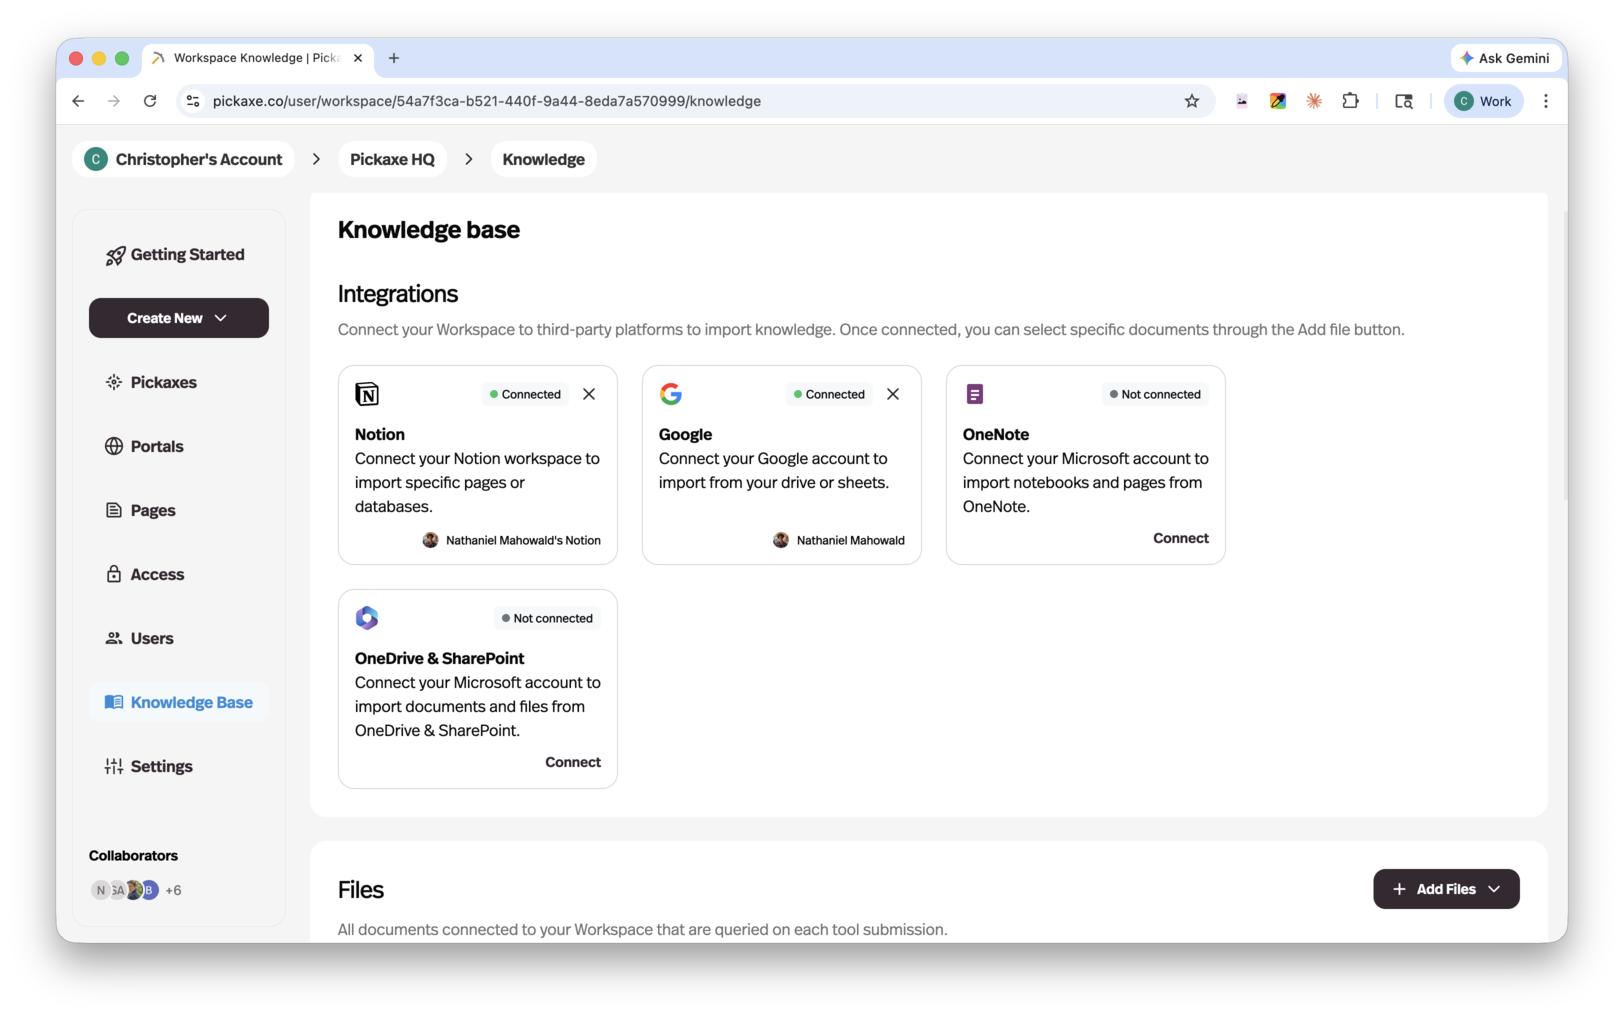
Uploading files and connecting sources
You can add a wide range of content types:
- Connected apps — Notion, OneNote, Google Drive, OneDrive/SharePoint. Once connected, Pickaxe runs daily checks for updates automatically, so your knowledge stays current without any extra effort.
- Web — Any URL.
- Audio — mp3.
- Text files — pdf, docx, txt, xml, pptx, md.
- Video — mp4.
- Plain text — manual text entry.
- Images — png, jpg, jpeg, webp, gif.
- YouTube — single videos, playlists, or whole channels (Pickaxe pulls the audio transcript).
- Data files — json, csv.
- RSS — feed URL.
When you upload a file, Pickaxe grabs all the text in it and adds it to the Knowledge Base. If you add a PDF with images embedded in it, the images won't be read — only text. For webpages, a third-party web-scraping service grabs the text on the page (not all webpages cooperate equally well with the scraper). For YouTube videos, Pickaxe grabs the audio transcript.
Spreadsheets are handled in a special way. Each row is converted into its own chunk, using the header row as properties, so the rows stay intact and the headers stay attached to their data. Here's a community post that explains how spreadsheets are added to the Knowledge Base in more detail.
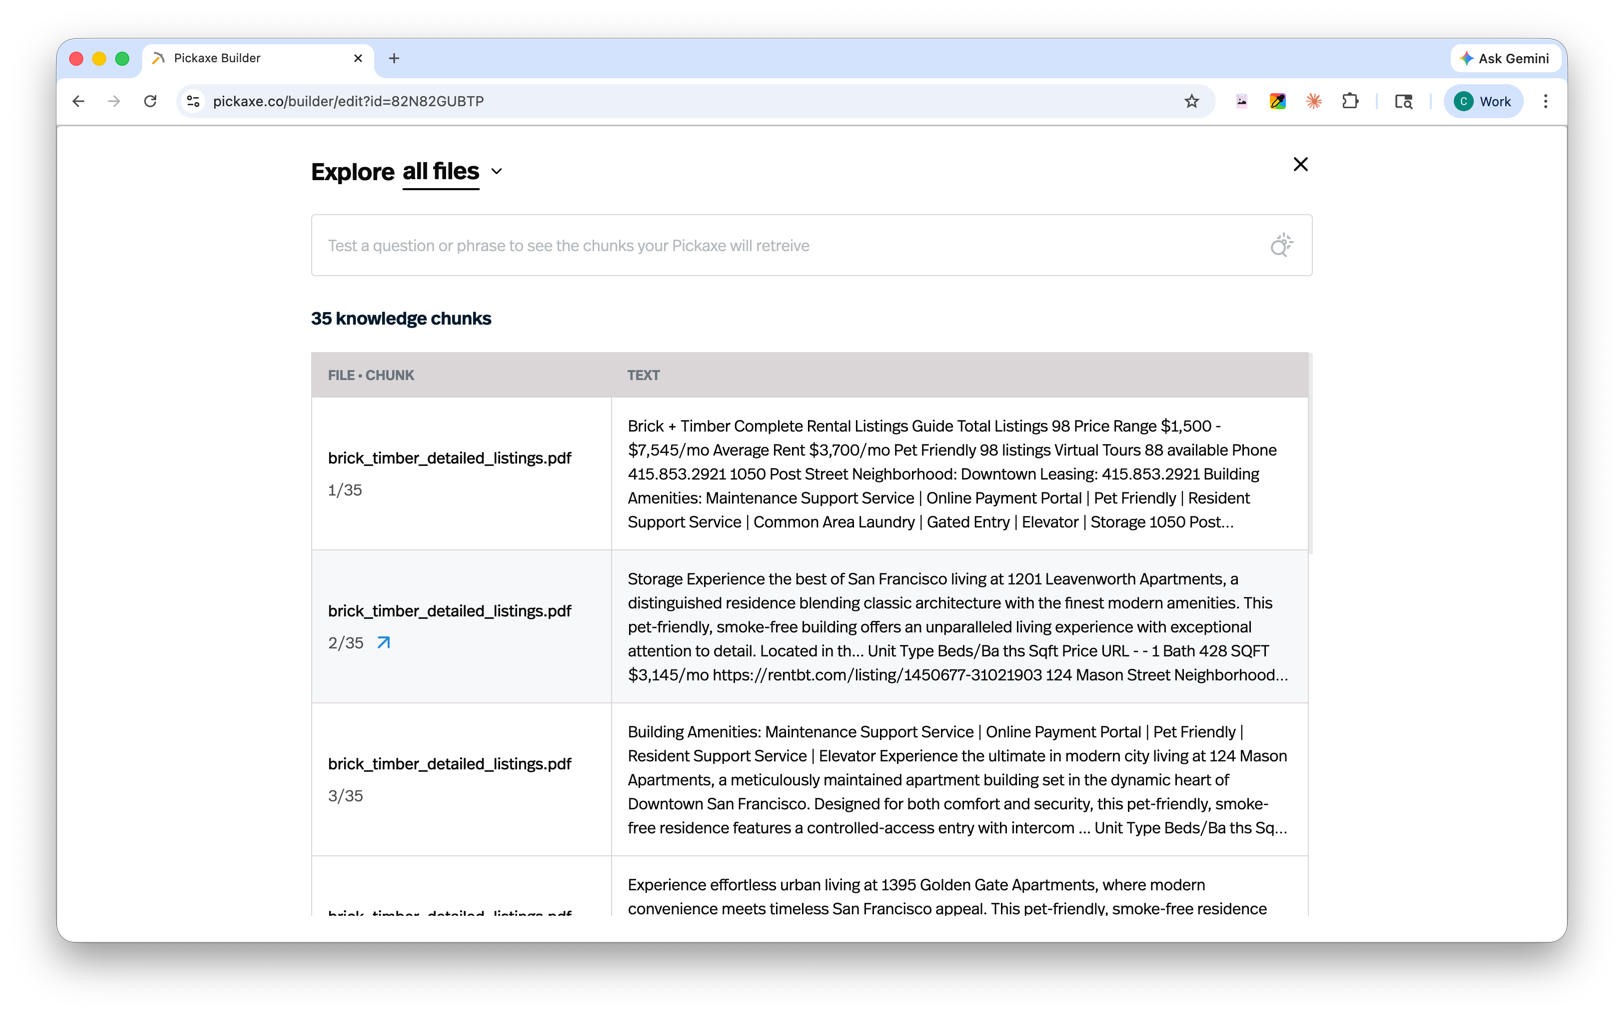
You can always click on a file in the Knowledge Base to see exactly what's being pulled from it. Clicking opens up the Chunk Explorer, where you can see every chunk, run sample queries against the search bar, and watch which chunks come up with their corresponding relevance scores.
Knowledge Base settings
You can control how the Knowledge Base pulls information using a few settings.
The Relevance Cutoff is a filter for how semantically relevant a chunk has to be in order to be pulled. Setting it to a higher number (like 0.9) means it will only return highly relevant chunks. Setting it to a lower number (like 0.4) will mean many more chunks are referenced. We recommend playing around with these settings.
The Amount setting is a limit on how many chunks total can be referenced. Raising the limit gives the agent access to more information, but too much text can dilute the quality of its response.
The Context setting is a way to provide extra context for how the AI should interpret the information you're putting into the Knowledge Base. For example, if you're uploading highly formatted JSON about products in a warehouse, you might use the context area to explain shorthand that wouldn't be obvious from the data alone. Most of the time, you can leave this alone.
For any response generated in the Preview tab, you can click the magnifying glass icon underneath the answer to see exactly which chunks were pulled. This is called Message Insights and it's the fastest way to debug whether your agent is finding the right information.
Here's a video tutorial about how to set up Knowledge Bases.
Connecting APIs to your agent
Actions
An Action is a way to let your agent do things beyond just generating text. Normally, an agent can read and write text, but it can't actually do anything — like send an email, post to Slack, or generate a PDF. That's where Actions come in. Think of an Action as a button your agent can press when the conversation calls for it.
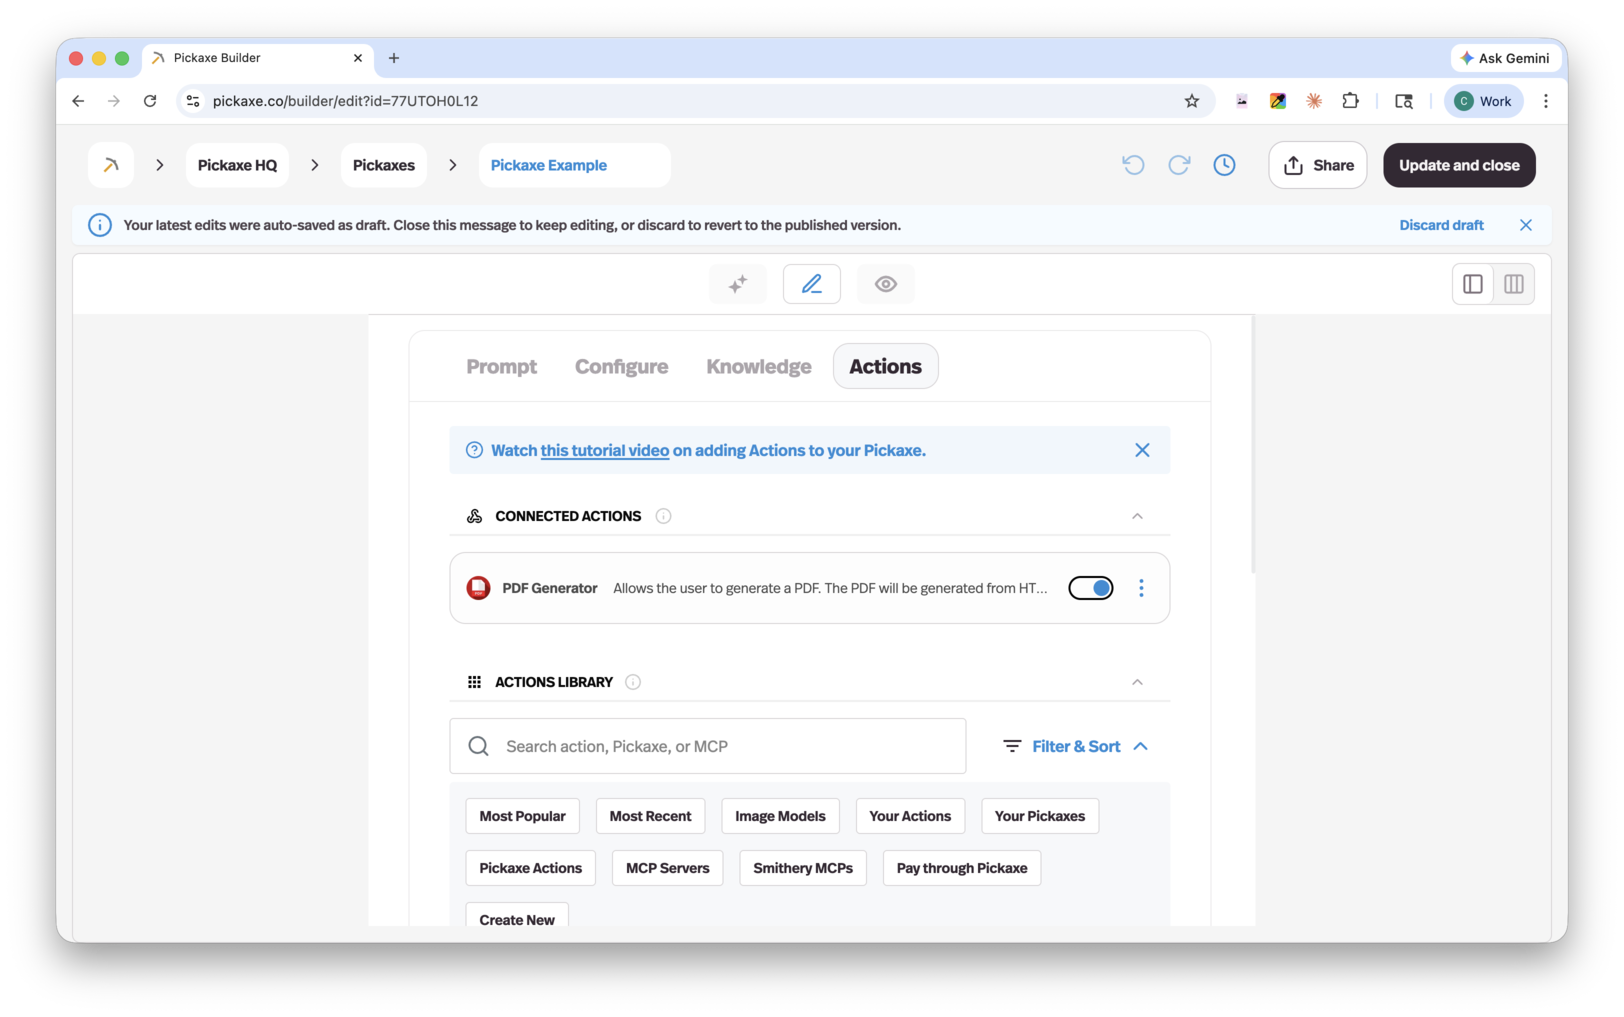
The Action Library
Pickaxe has a built-in Action Library with a wide range of pre-built integrations. You can also connect an agent to another agent, allowing one agent to trigger another as part of a larger workflow.
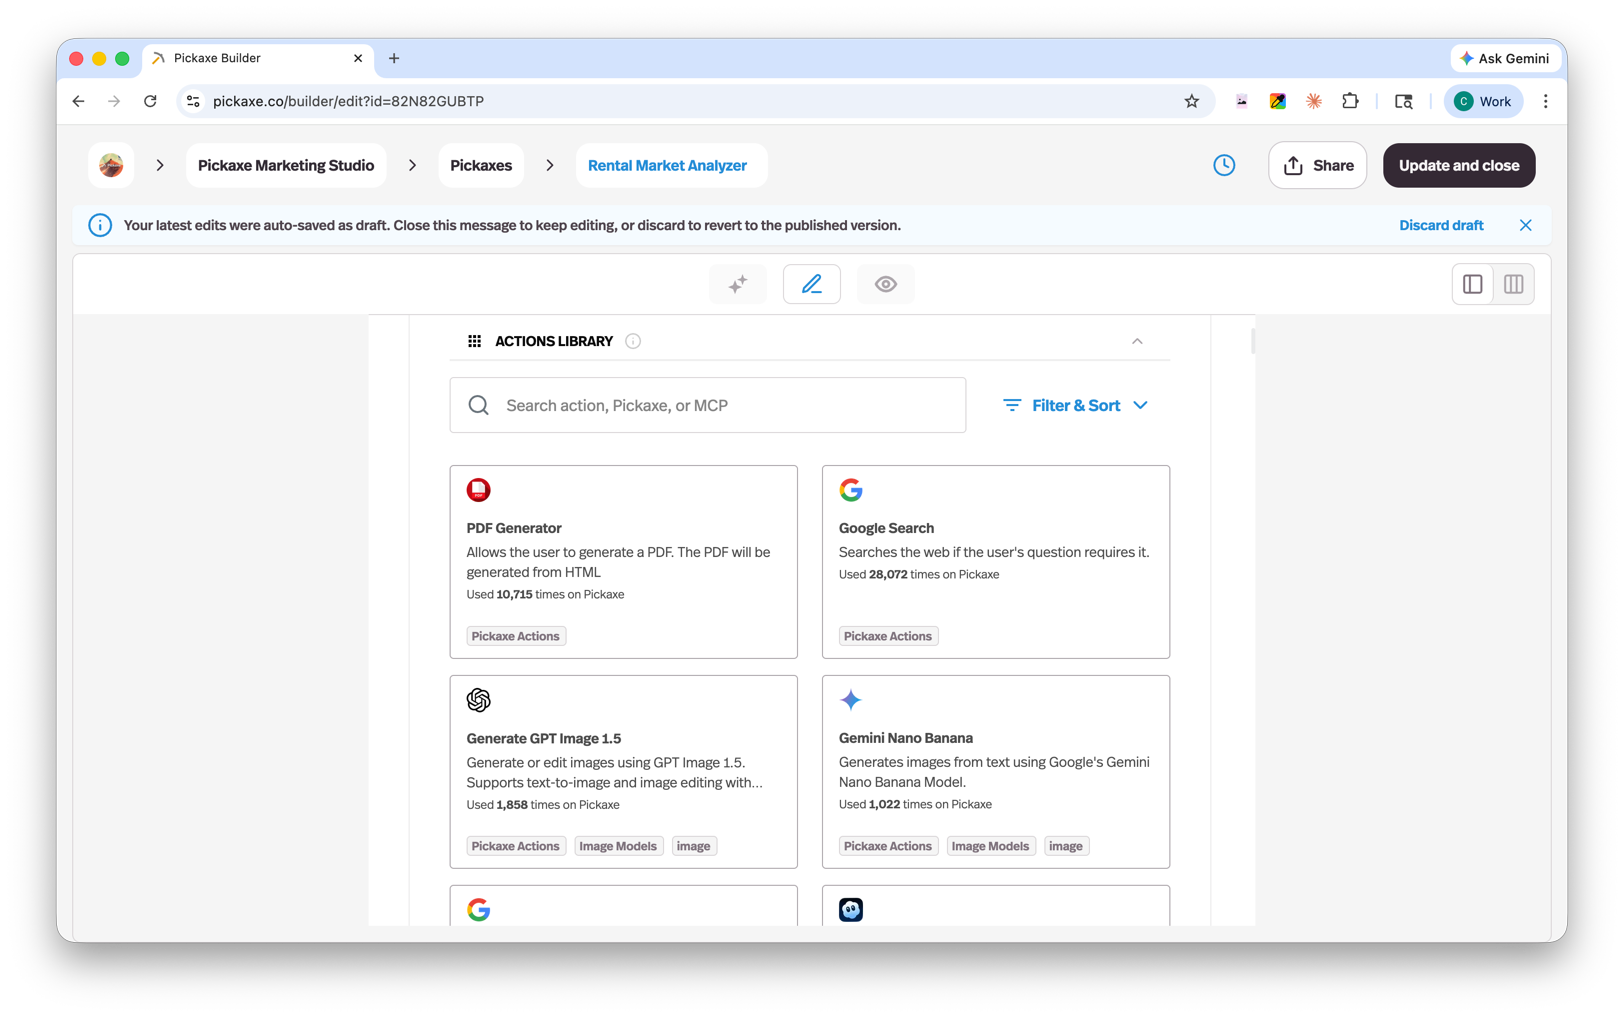
To connect an Action, go into the Actions tab and select an Action from the library. When you click it, you'll be asked to fill out a few setup fields. The fields differ depending on what the Action does, but every Action has a Trigger Prompt. The Trigger Prompt is written in plain language and tells your agent exactly when and how to use the Action.
How agents decide when to use an Action
When a user interacts with your agent, the AI decides whether an Action should fire based on the conversation. To get reliable results, you should describe when an Action should be used in two places:
- Role prompt — Include instructions in your main Role prompt that describe when and why the agent should use the Action.
- Trigger prompt — Each Action has its own trigger prompt where you specify the exact conditions that should cause it to fire.
Being explicit in both places helps your agent know exactly when to act and when to keep chatting.
How many Actions per agent?
You can connect multiple Actions to one agent, but we recommend no more than four. Too many Actions makes it harder for the AI to consistently choose the right one.
If your use case requires more than four, the best approach is a waterfall setup — a primary agent that routes to other agents, each with their own focused set of Actions. This keeps each agent simple and reliable while still covering complex workflows.
Custom Actions
You can also create your own Action. This is for more advanced users — it lets you write your own Action in Python that you can teach an agent to call.
Here's a video tutorial about setting up Actions.
Here's a video tutorial about creating your own advanced Actions.
An easy shortcut: connect a single Action to an automation tool like Zapier, Make, Pabbly, or IFTTT, and use that platform to build advanced workflows. Then a single Action can trigger the whole automation. Here's a video tutorial about creating a Make webhook Action.
Actions are one of the most powerful parts of Pickaxe. They can also feel intimidating at first. If you have questions, the Actions section of the community forum is a great place to ask.
Portals
What is a Portal?
Portals are branded, multi-agent hubs — a place where you can bundle multiple agents and pages together and serve them as one unified product. They are the primary deployment type on Pickaxe and the cleanest way to package your agents into something sellable. (If you've been around Pickaxe for a while, Portals are what we used to call Studios.)
You can host your Portals at studio.pickaxe.co or connect them to your own custom domain.
The Portal Editor
The Portal Editor has four tabs: Content, Design, Access, and Lock.
Content
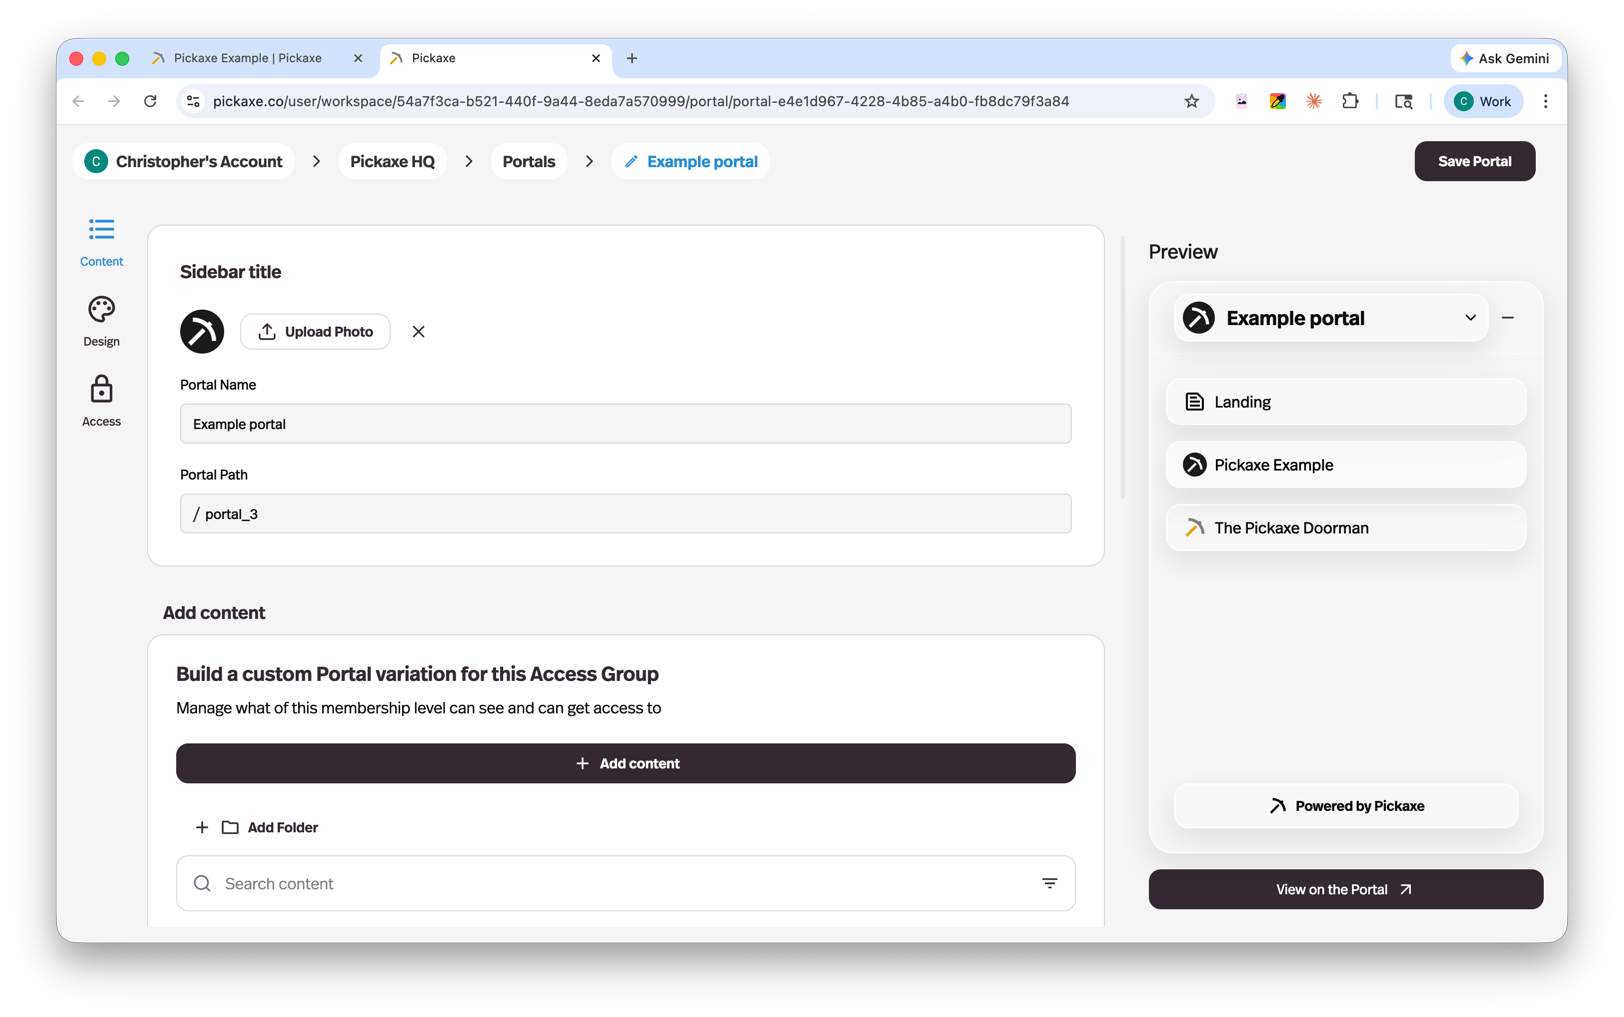
The Content tab is where you manage everything inside your Portal:
- Add and arrange agents and Pages inside your Portal.
- Organize content into folders for a clean navigation structure.
- Customize the Portal name and settings.
Agents are deployed to Portals as links in the side menu, so users can navigate between them easily.
You can add three types of things in the Content tab: agents, Pages, and folders.
Agents are your AI tools. An agent does not automatically appear in your Portal unless you specifically add it. You can bulk-add agents from the Content tab.
Pages are simple content pages where you can add text, images, and even video embeds. You can use Markdown sections or HTML sections inside a Page. You can read more about Pages here.
Folders are buckets where you can group related agents and Pages together. Folders are collapsible and expandable in the navigation.
You can re-order pages by dragging them up and down the left-hand menu at any time.
Design
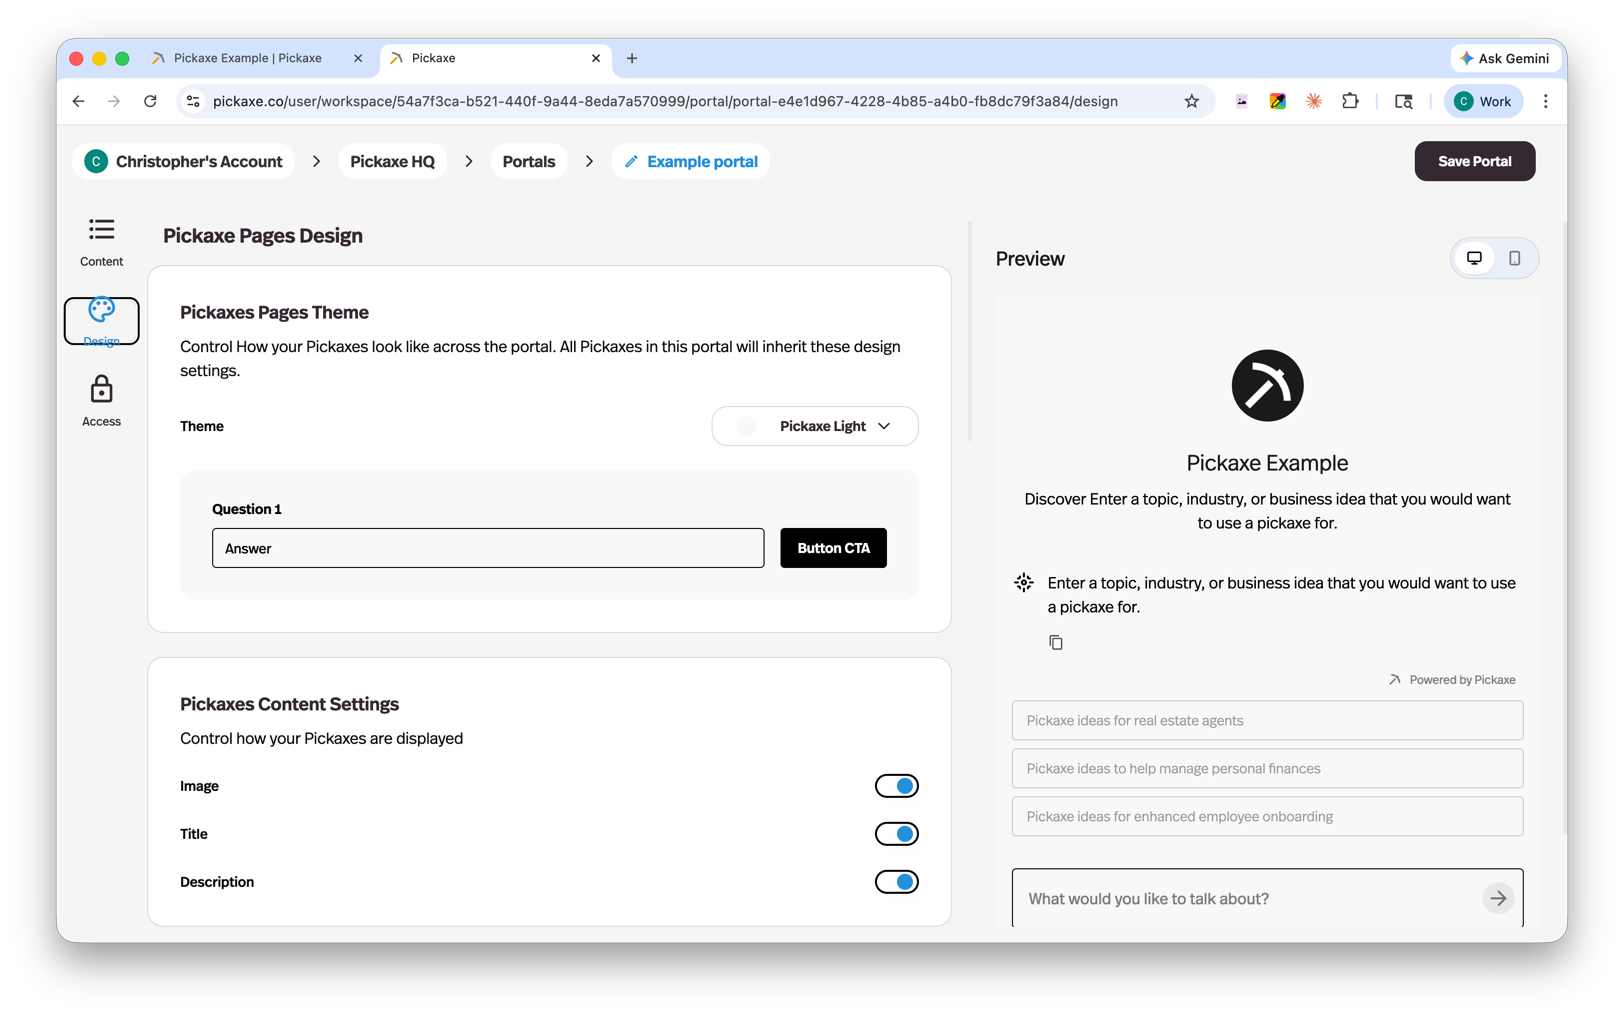
The Design tab gives you full control over the look and feel of your Portal:
- Customize the visual design — colors, fonts, text sizing, logos, white-labeling.
- Add custom code in the header or footer for advanced styling, ad tracking, or analytics.
You'll see a live preview of your Portal as you make changes.
Access
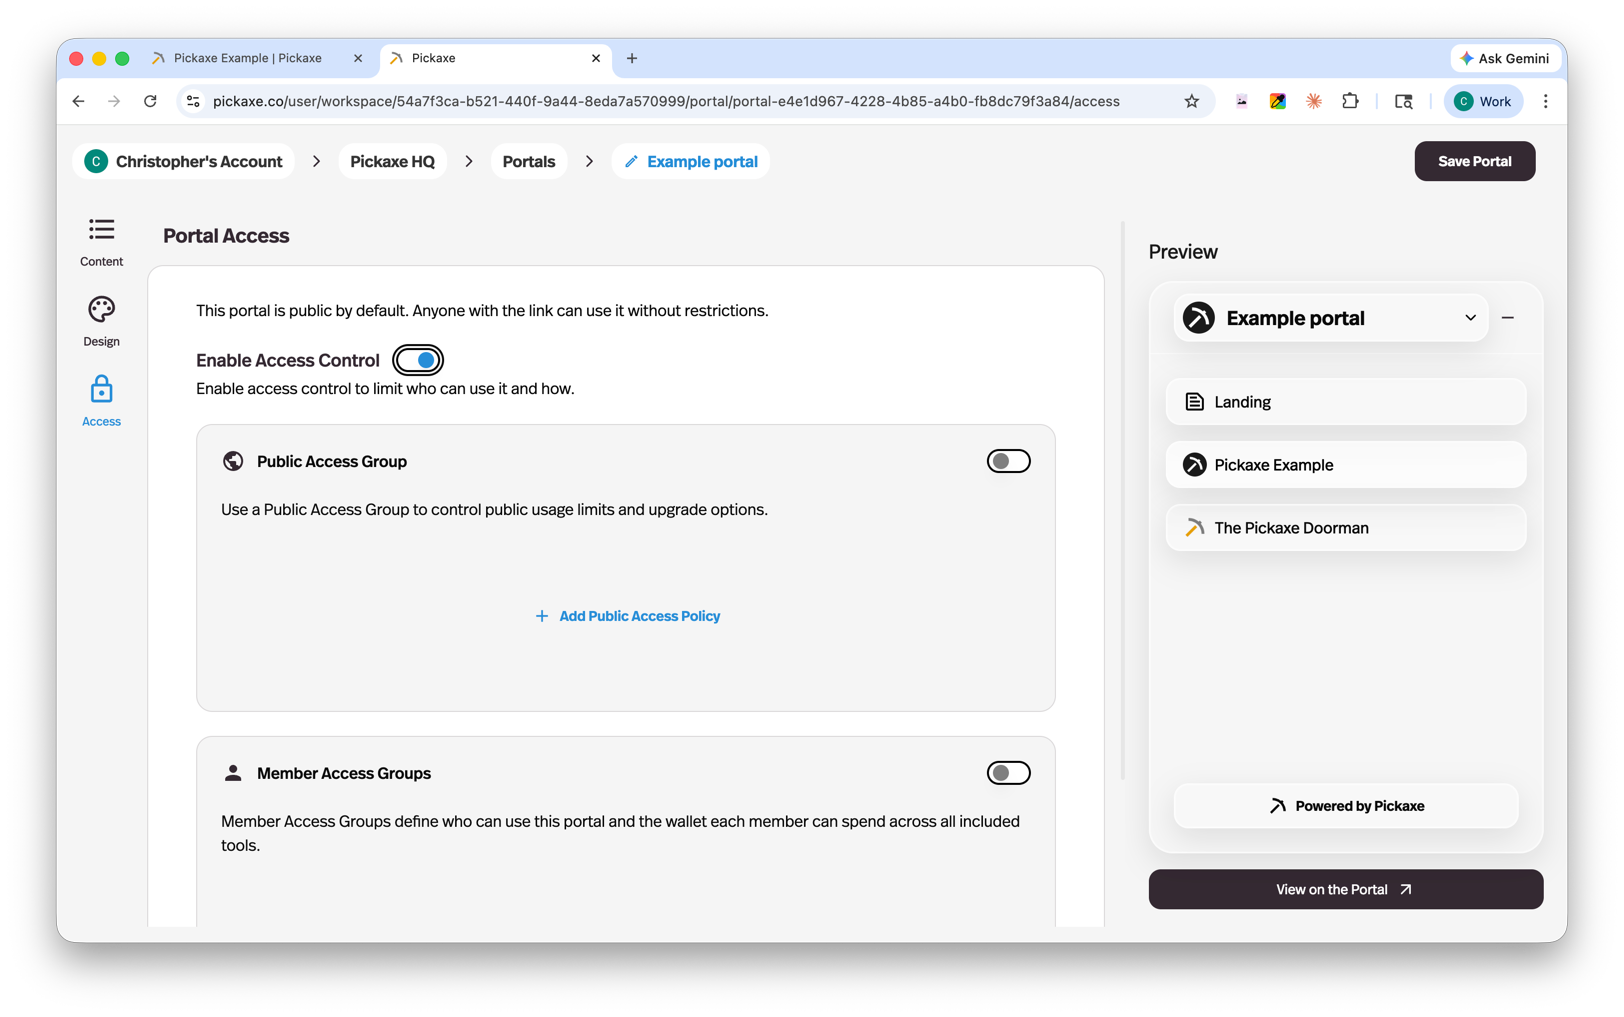
The Access tab is where you connect access groups to your Portal. Access groups control who can use your Portal and what they can do (we'll cover access groups in detail in the next section).
Important: every access group needs one Portal to represent it. You can connect multiple access groups to a single Portal, but you cannot connect multiple Portals to one access group.
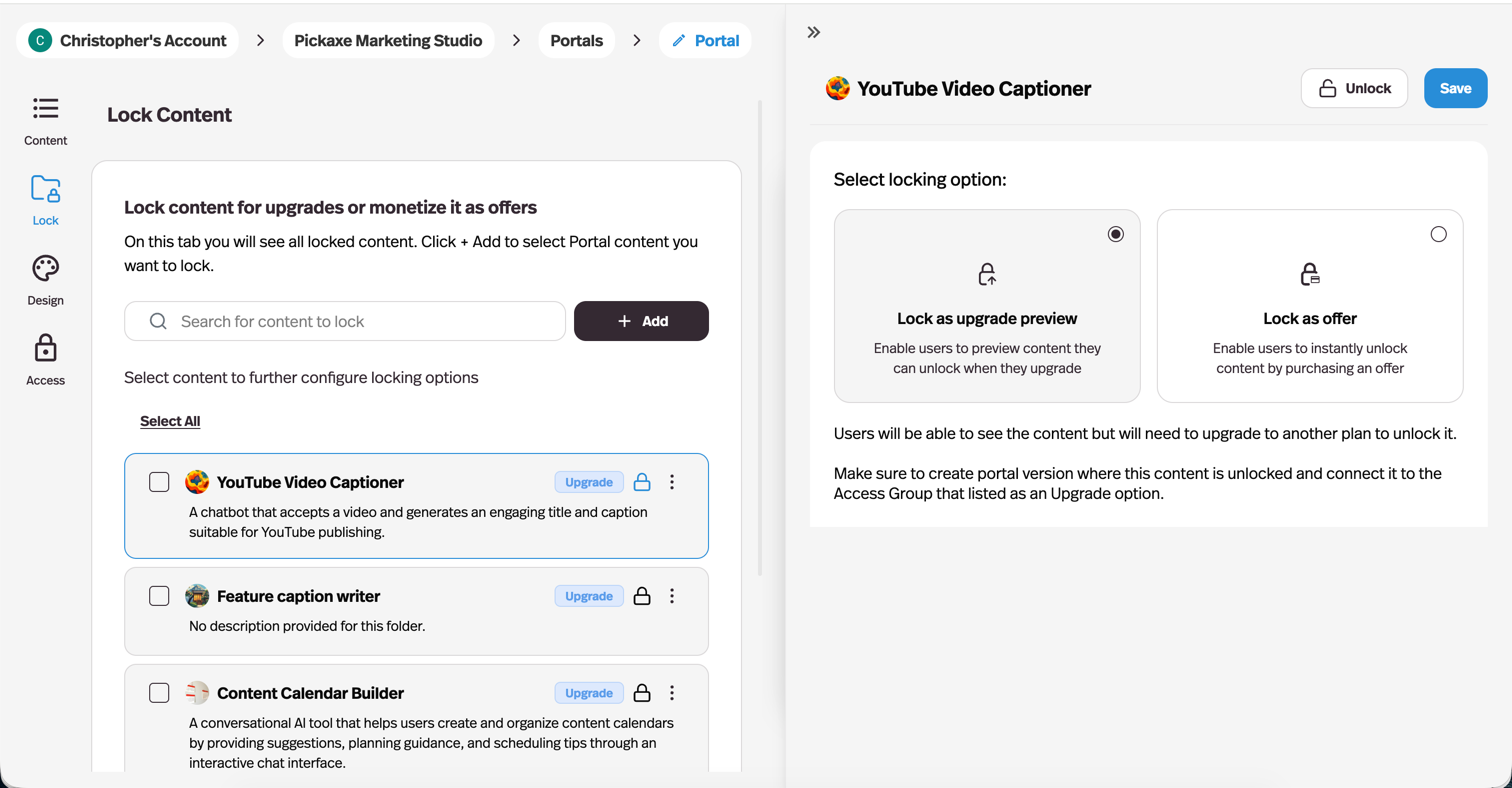
Lock
The Lock tab lets you lock individual agents, Pages, or entire folders of content. Locked content can be set up as an upgrade preview (visible but gated until the user upgrades) or as an offer (purchasable one-off access). This is useful for selling multiple ad-hoc products without creating separate Portals or access groups for each.
What your users see
When users visit your Portal, they see a clean interface with:
- Your content — the agents and Pages you've added, displayed front and center.
- A dropdown menu listing all available content for quick navigation.
- A right-side menu with Search, Pricing, Uploads (where they can see everything they've uploaded across your agents), and Profile (or a login/sign-up button if they're not logged in).
Public vs Member Access
Access in Pickaxe is built on access groups. There are two kinds.
Public Access Groups
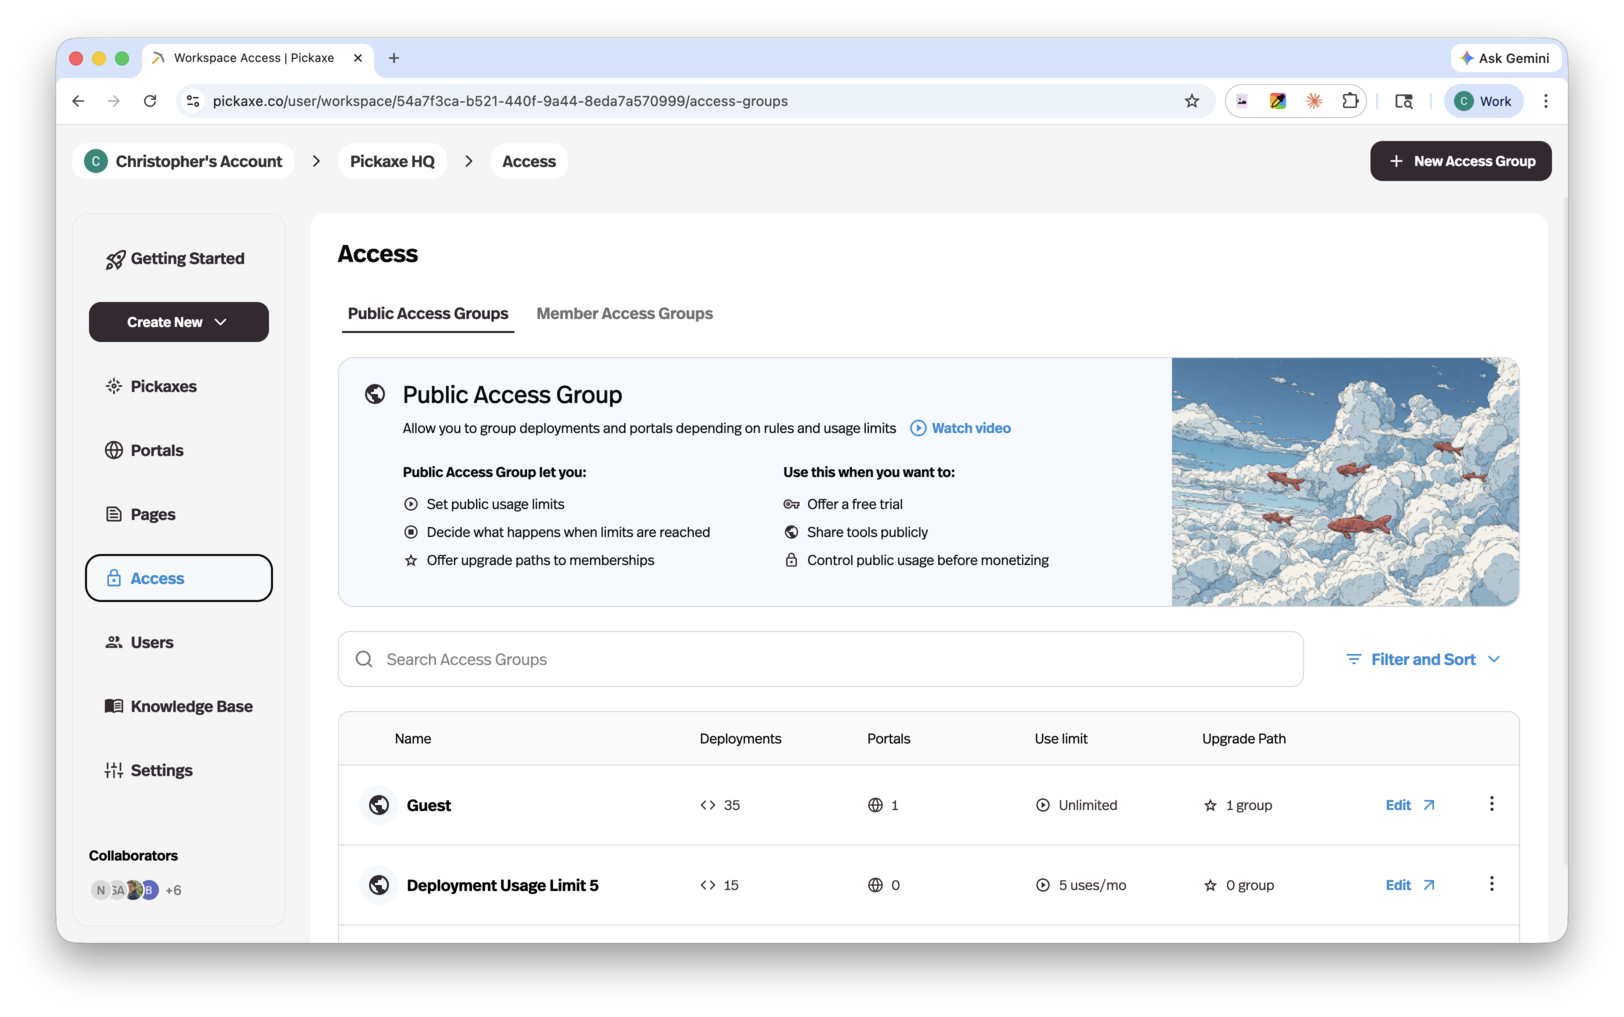
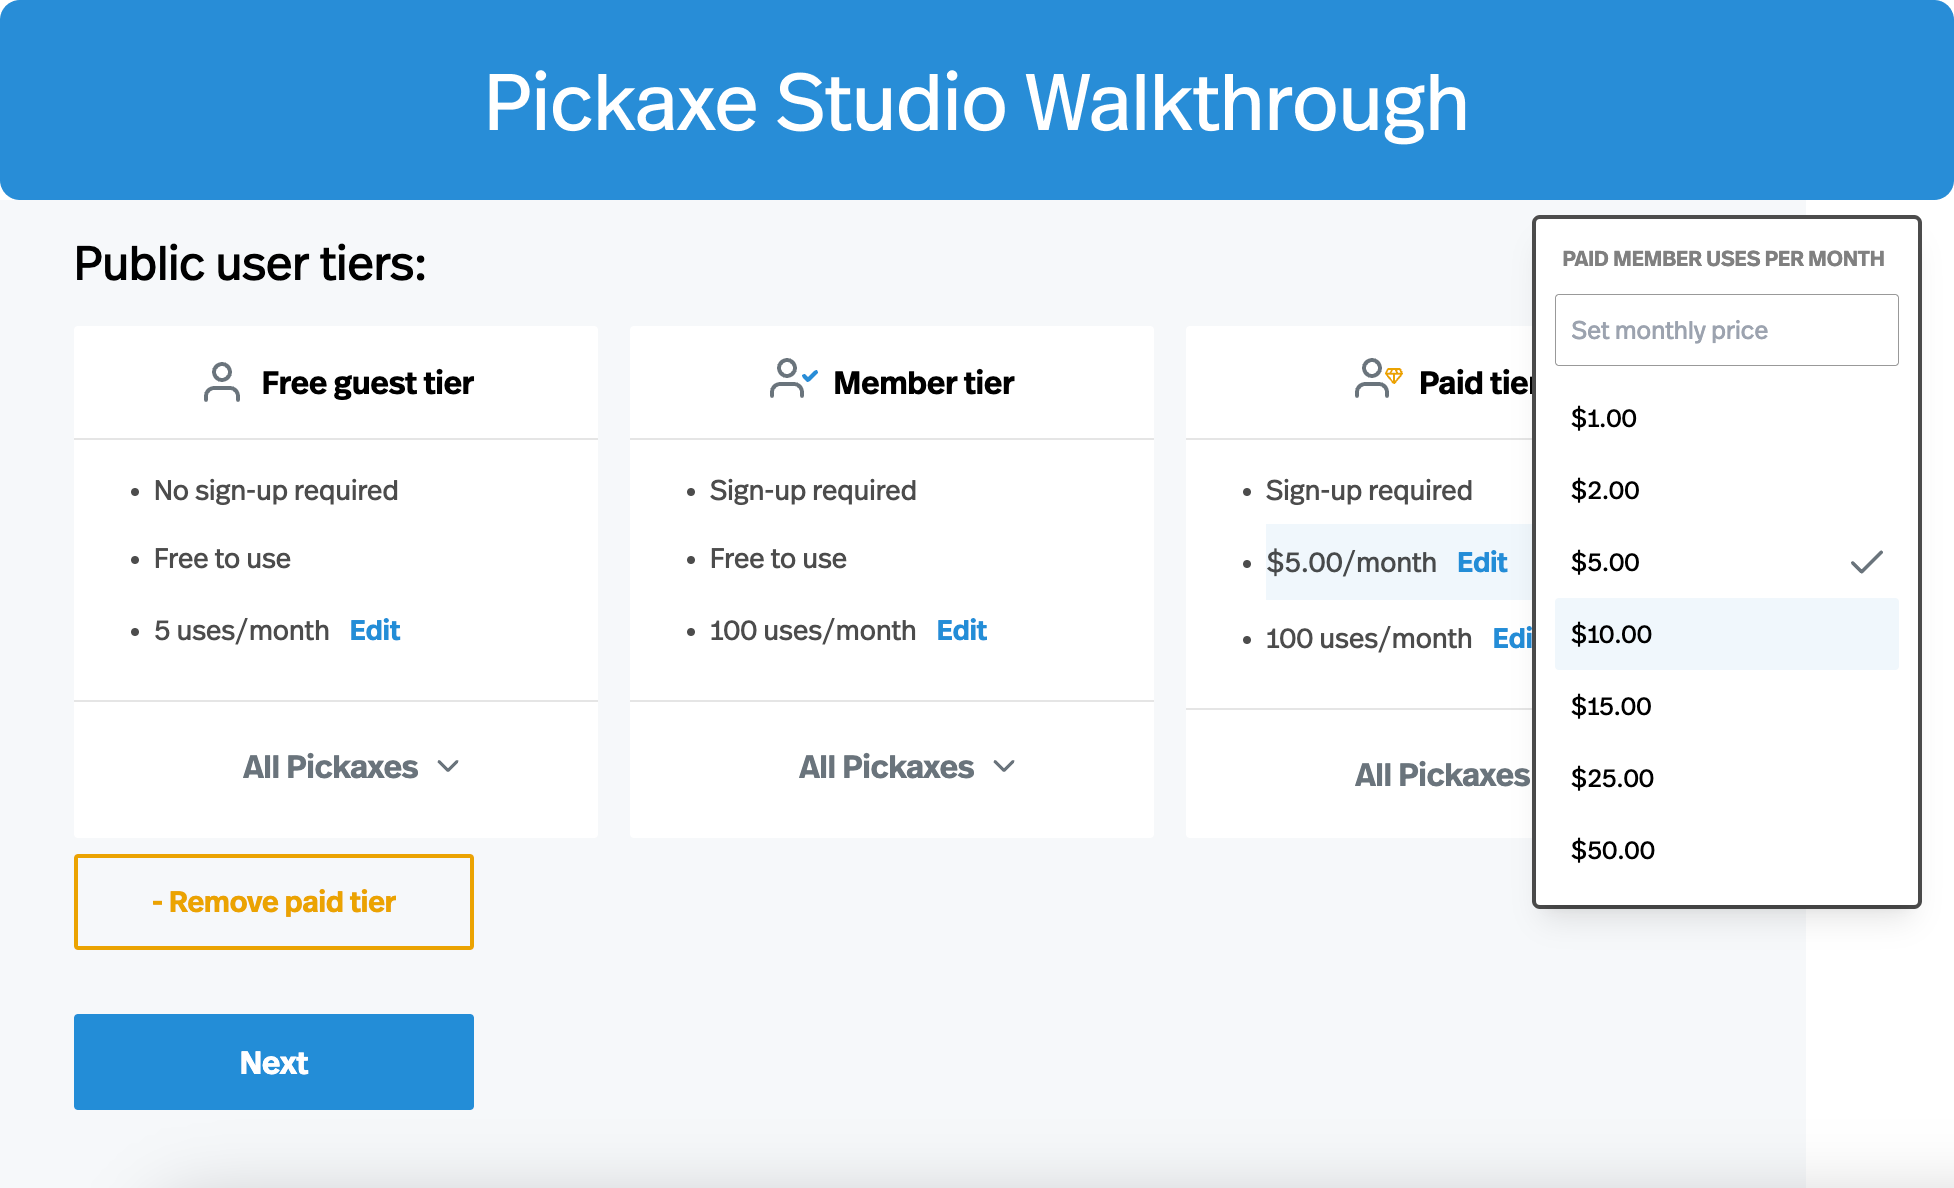
A Public Access Group is open to anyone with the link. No login is required. A user still needs the URL to your Portal in order to access it — making a Public Access Group "public" doesn't mean it's listed anywhere on Pickaxe — it just means visitors don't have to sign up to use it. Public users are still subject to your usage limits. For example, if you allow zero free uses, visitors won't be able to run any agents until they upgrade.
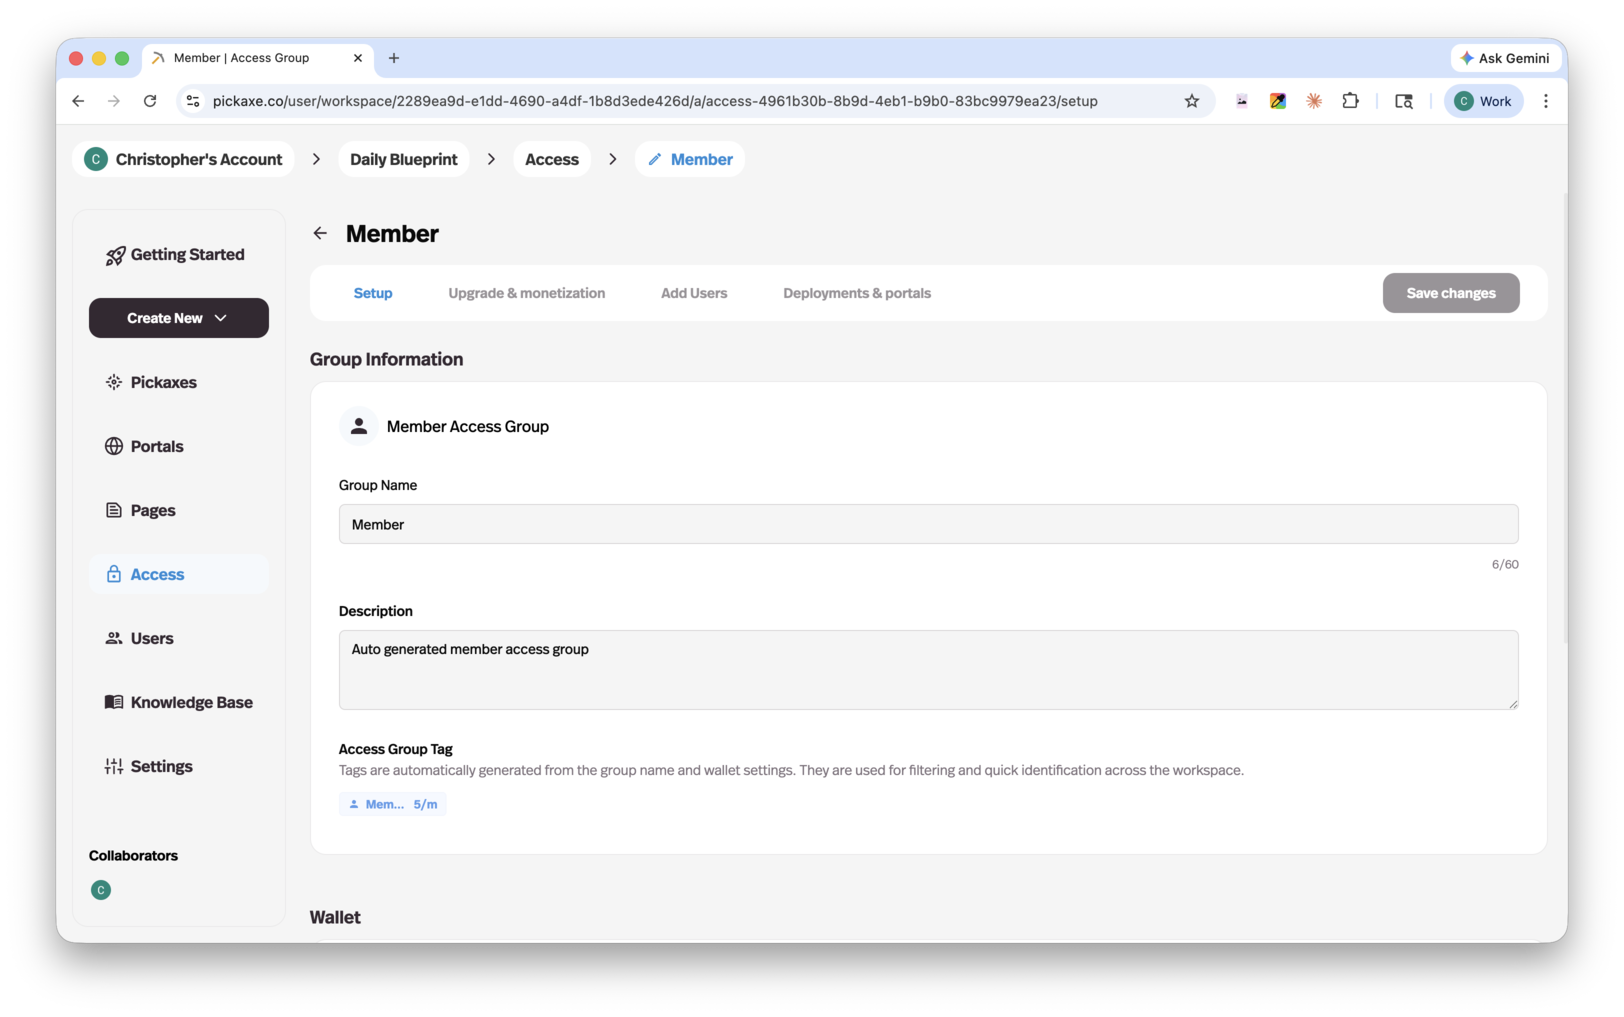
Member Access Groups
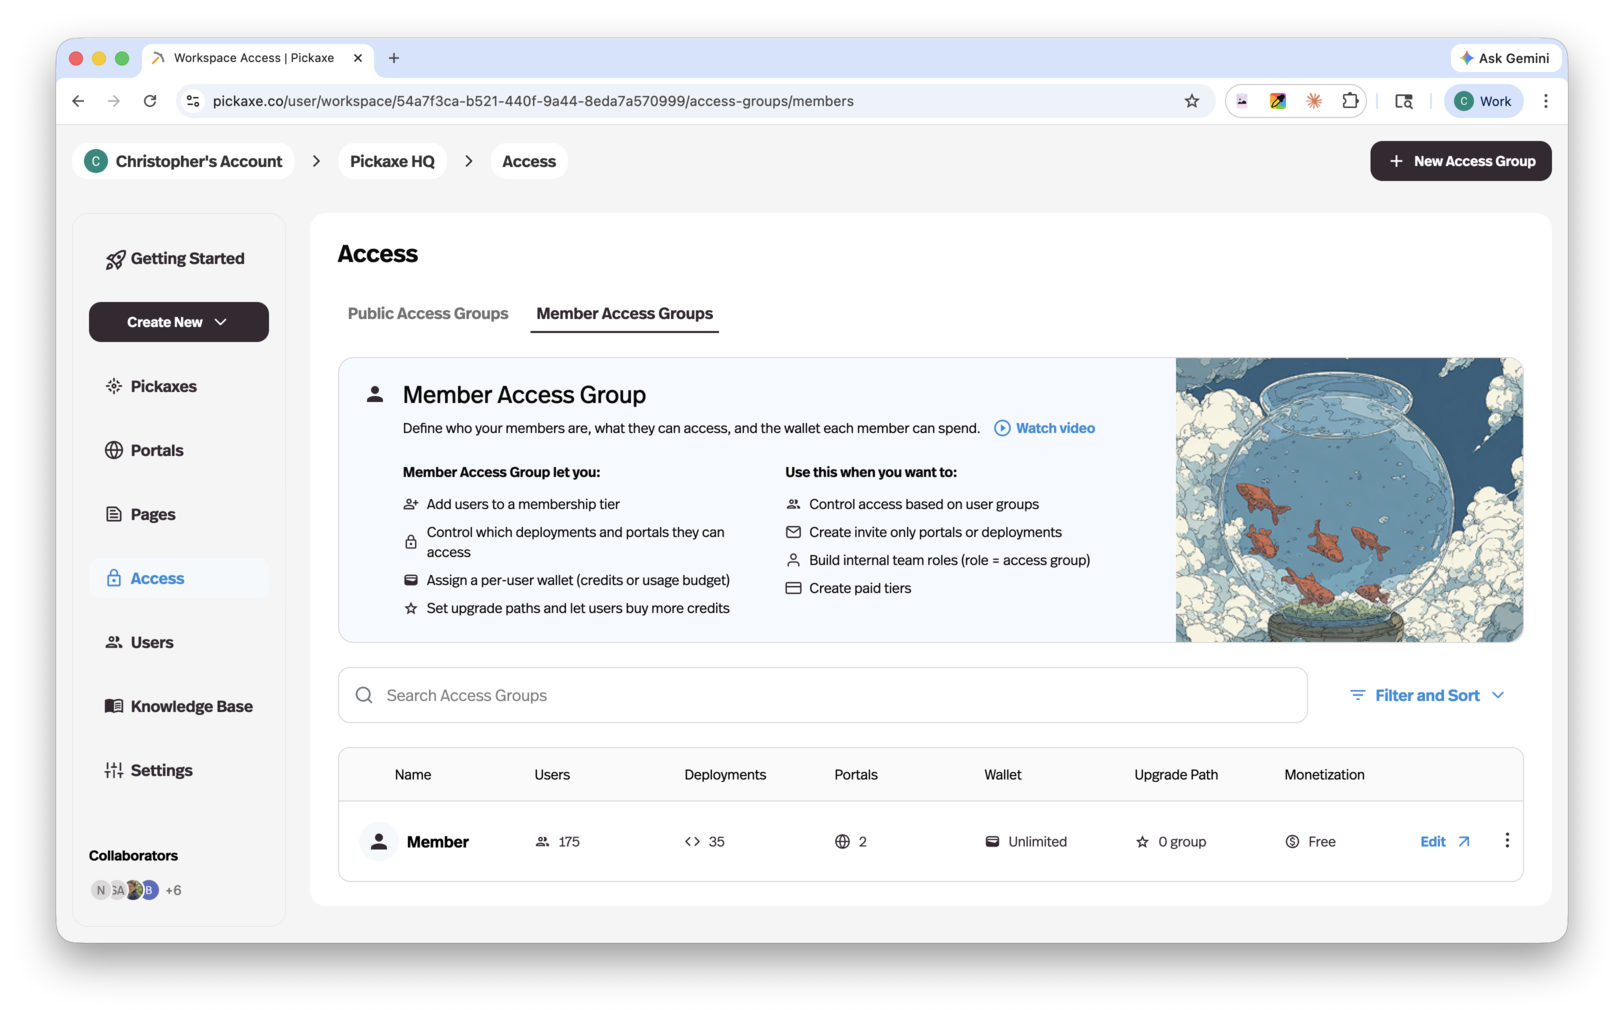
A Member Access Group requires a user to sign up or be invited before they can use the Portal. Any user who tries to access a Member-only Portal hits a login wall until they sign up or are approved.
You can invite users by going to the Users tab and clicking the "+ Add User" button. You can pre-assign an access level when you invite them. If a user requests access on their own, you'll receive an email asking you to approve.
You can connect multiple access groups to a single Portal — for example, a Public group with limited free usage and a paid Member group with full access — and Pickaxe will route each user to the right experience automatically.
Pages and content
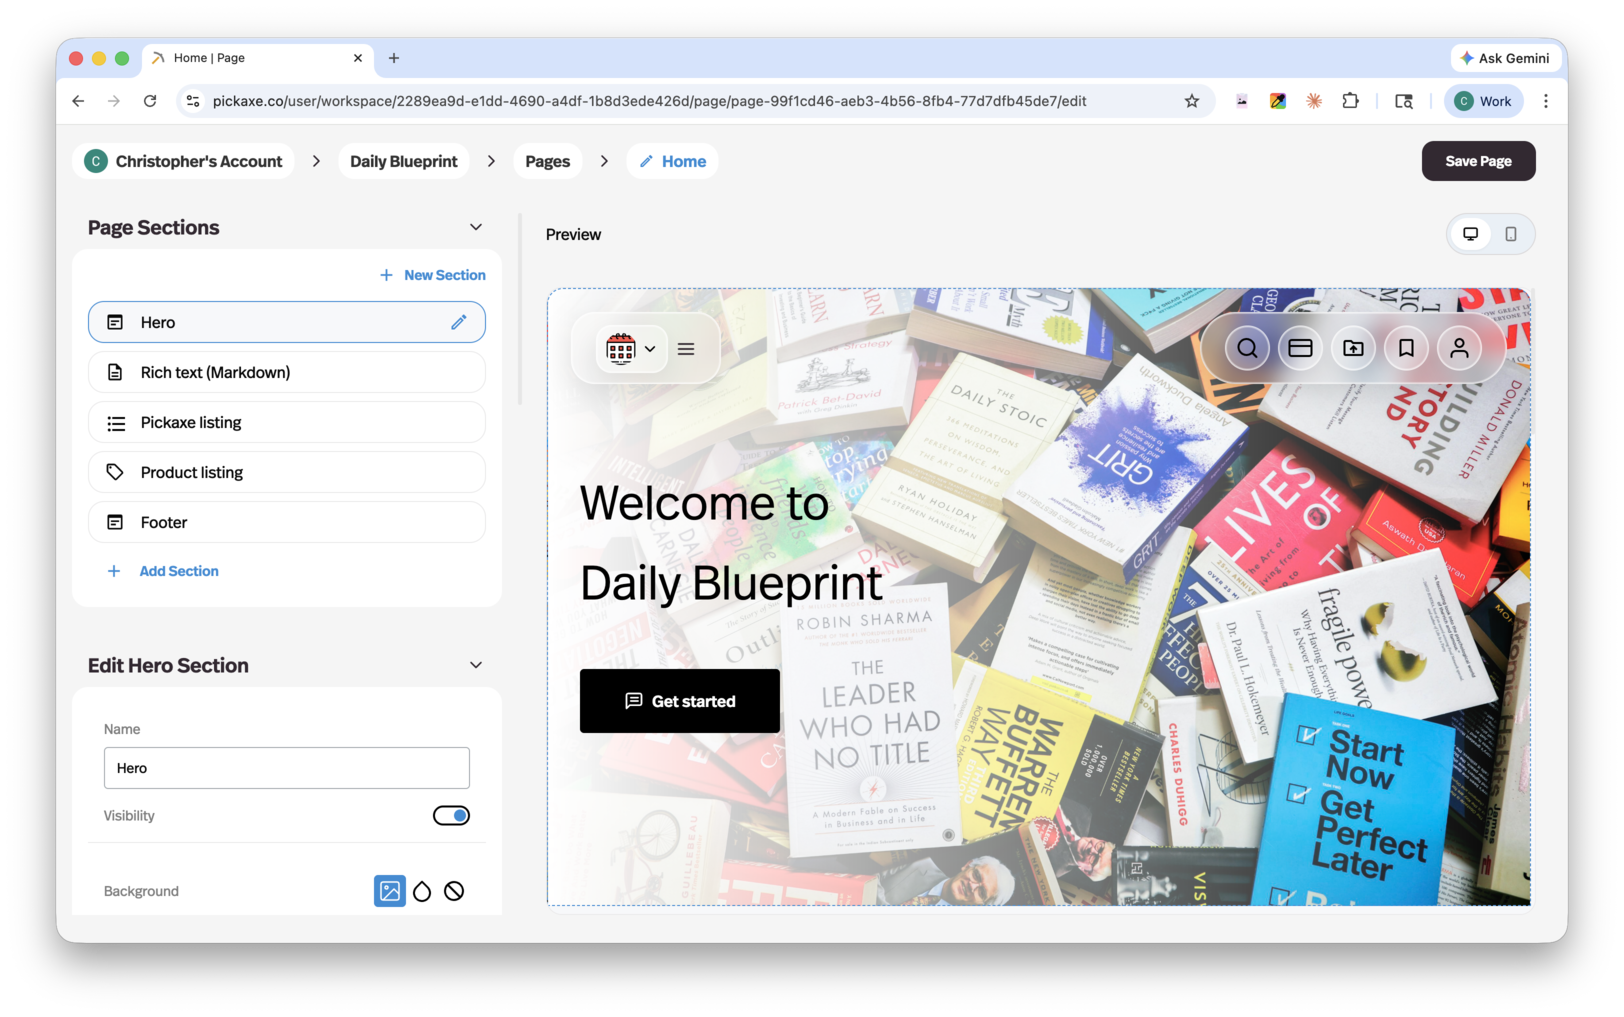
Pages are simple content pages you can add to your Portal alongside agents. You can use them for documentation, onboarding, FAQs, marketing copy, video walkthroughs, or anything else you want to put in front of your users.
Inside a Page, you can drop in either Markdown sections or HTML sections. To edit, click "Edit Page" in the top right of the page. To save, click "Save Edits" in the same corner.
Builders often use Pages as a free, ungated entry point — a piece of helpful content that brings users into the Portal, where they then discover the (paid) agents inside.
Monetizing, paywalls, and restrictions
Pickaxe is the first platform that lets you truly monetize your AI agents — putting them out into the world and building real, agent-powered businesses on top of them.
Monetization models
Pickaxe supports several ways to charge for access:
- Subscription — Charge a recurring fee on a daily, weekly, monthly, or yearly basis. Great for recurring revenue and tiered product offerings.
- Pay-per-usage — Sell credits or uses to your users. When they run out, they can upgrade and buy more. Works well for tools with variable usage patterns.
- One-time payment — Charge a single upfront fee for access. Often best paired with a pay-per-usage option to cover ongoing AI costs.
- External payments — Link users to a third-party payment site, then manage access manually.
How to set up monetization
- Go to the Access section of your agent or Portal and enable access control.
- Create a Member Access Group.
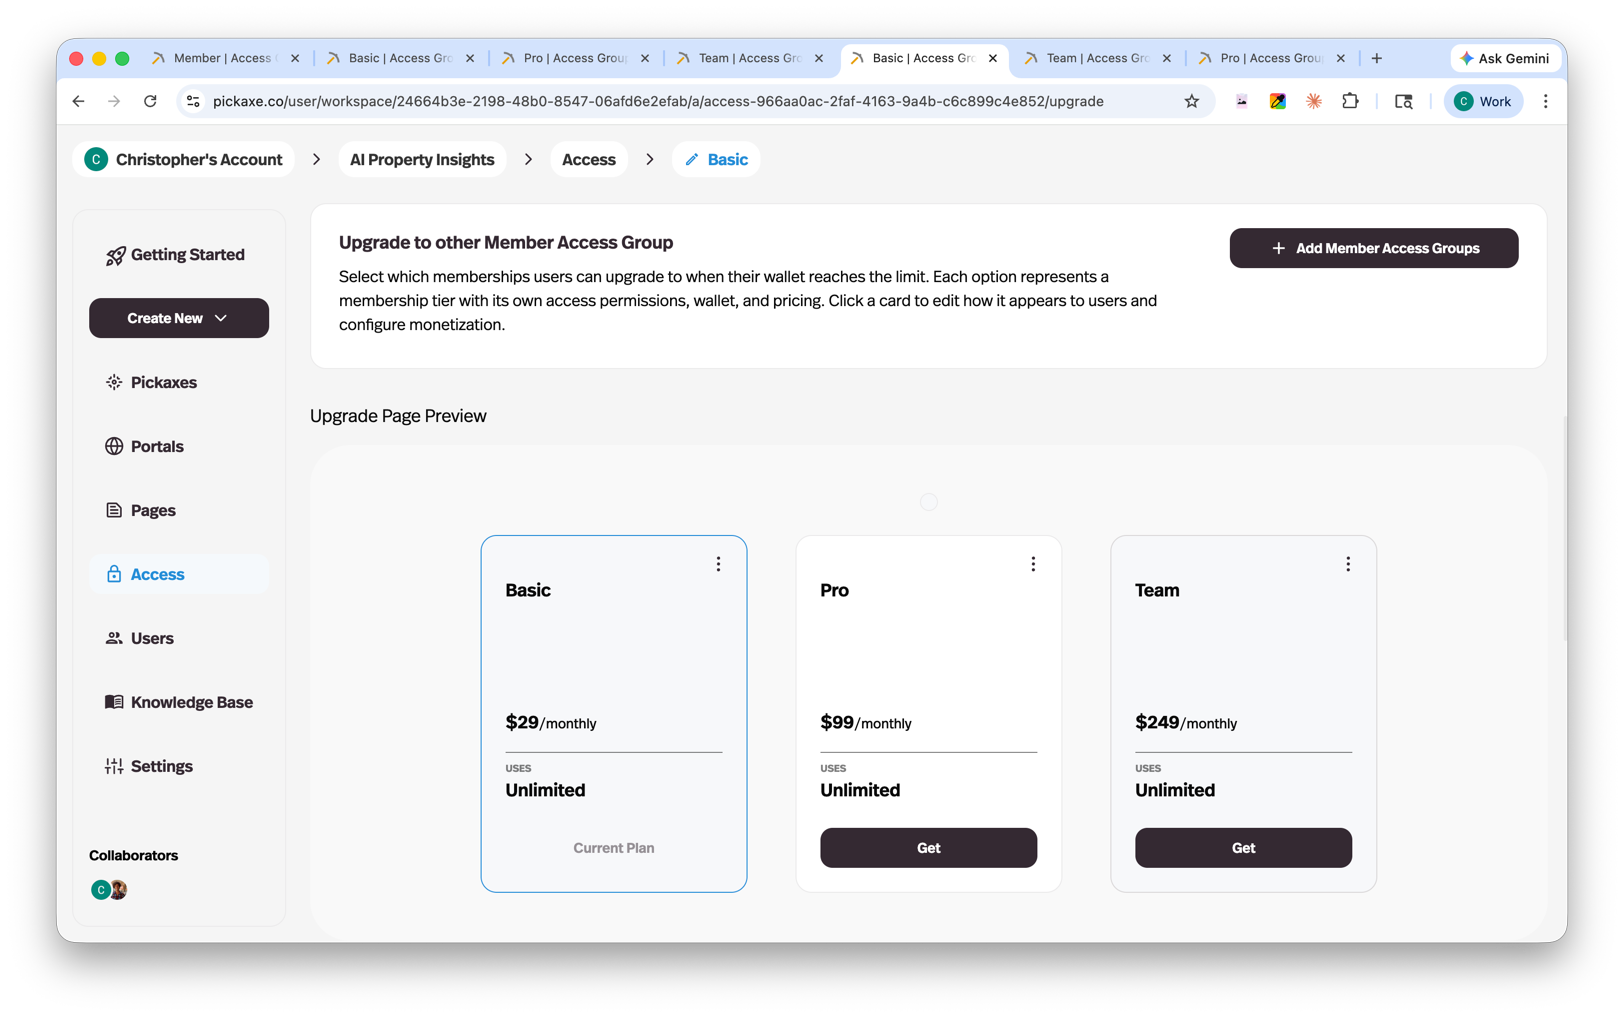
- Inside that group, open the Monetization and Upgrade tab.
- Toggle on "Charge for upgrade to this Access Group".
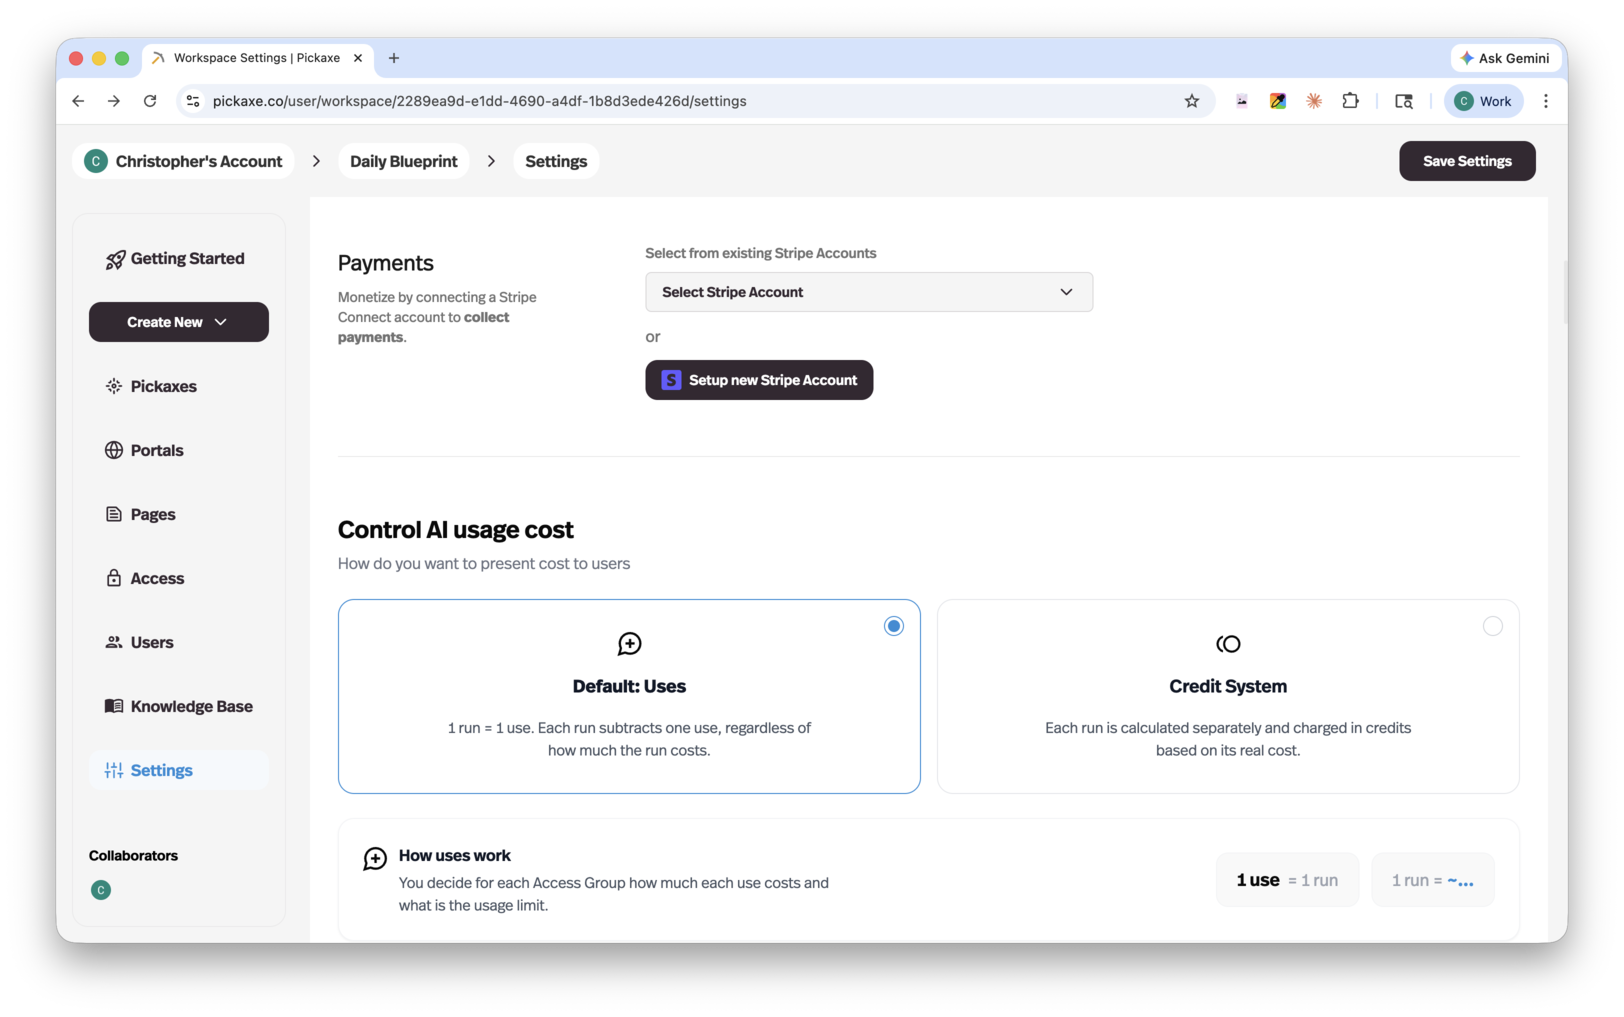
- Select either a one-time payment or subscription and set your price.
- Connect your Stripe account by clicking Connect to Stripe, which will take you to the Settings page. If you don't have a Stripe account yet, click Set Up Stripe Account and follow the on-screen instructions.
For a step-by-step walkthrough, see our guide on setting up monetization with Stripe.
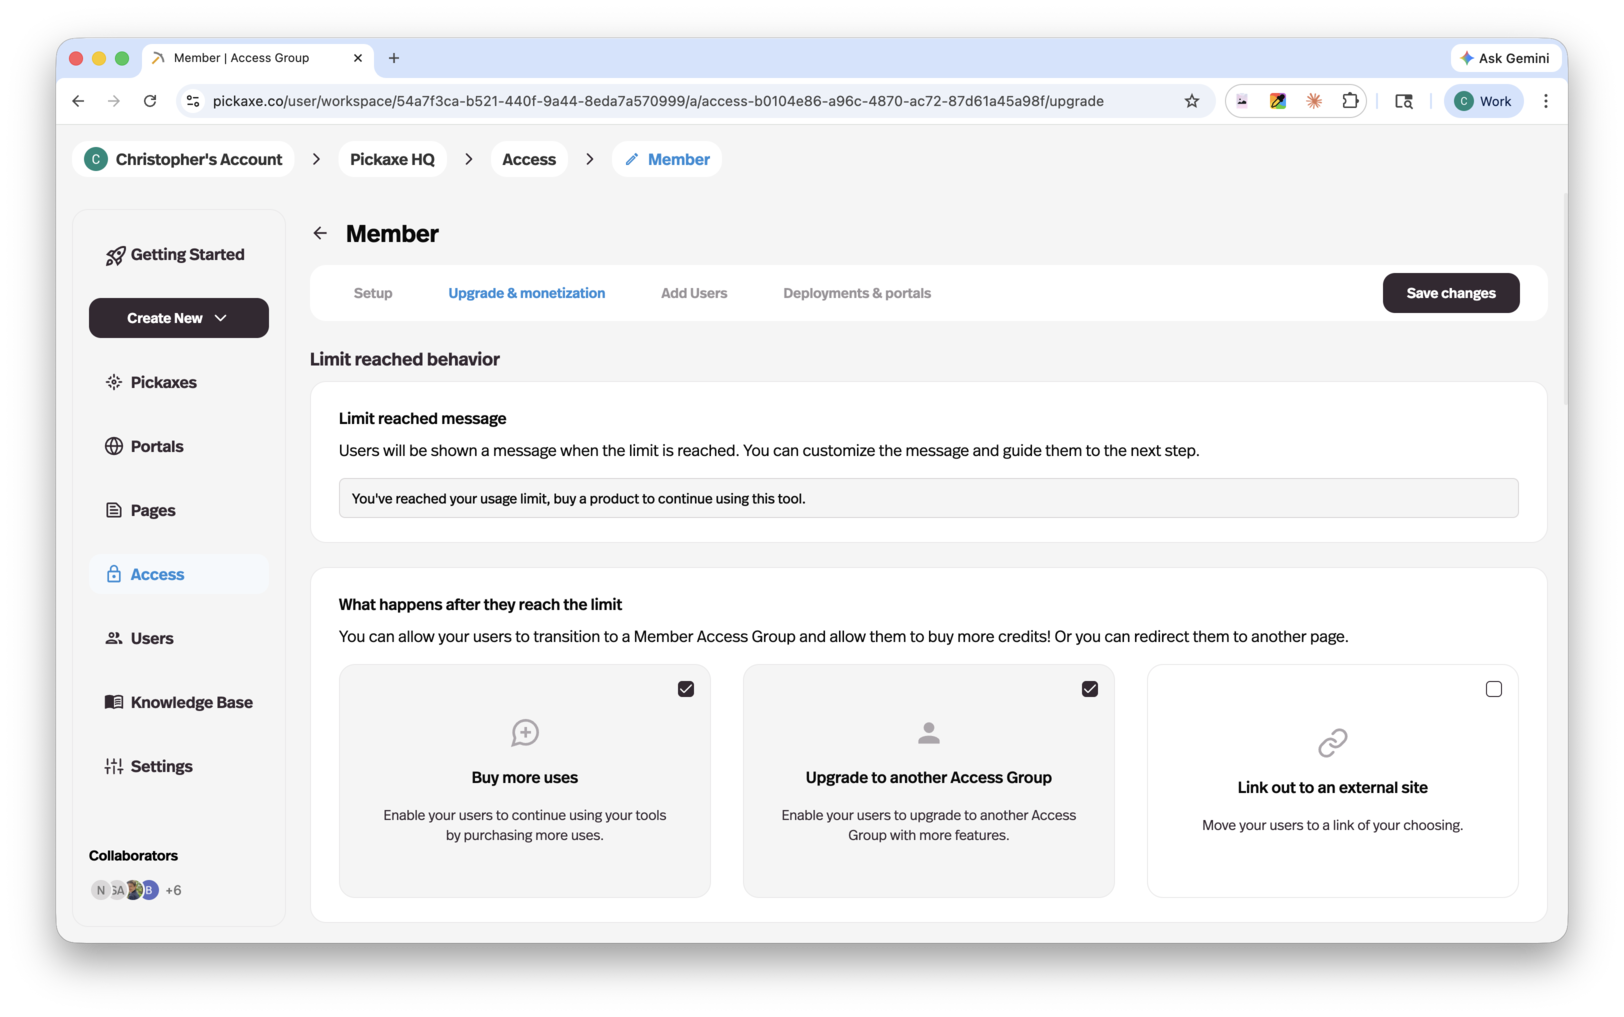
What happens when users hit their limit
You can configure exactly what happens when a user reaches their usage limit:
- Buy more uses or credits — let them top up within their current group.
- Upgrade to another access group — prompt them to move to a higher tier.
- External link — send them to a third-party payment page.
Offers
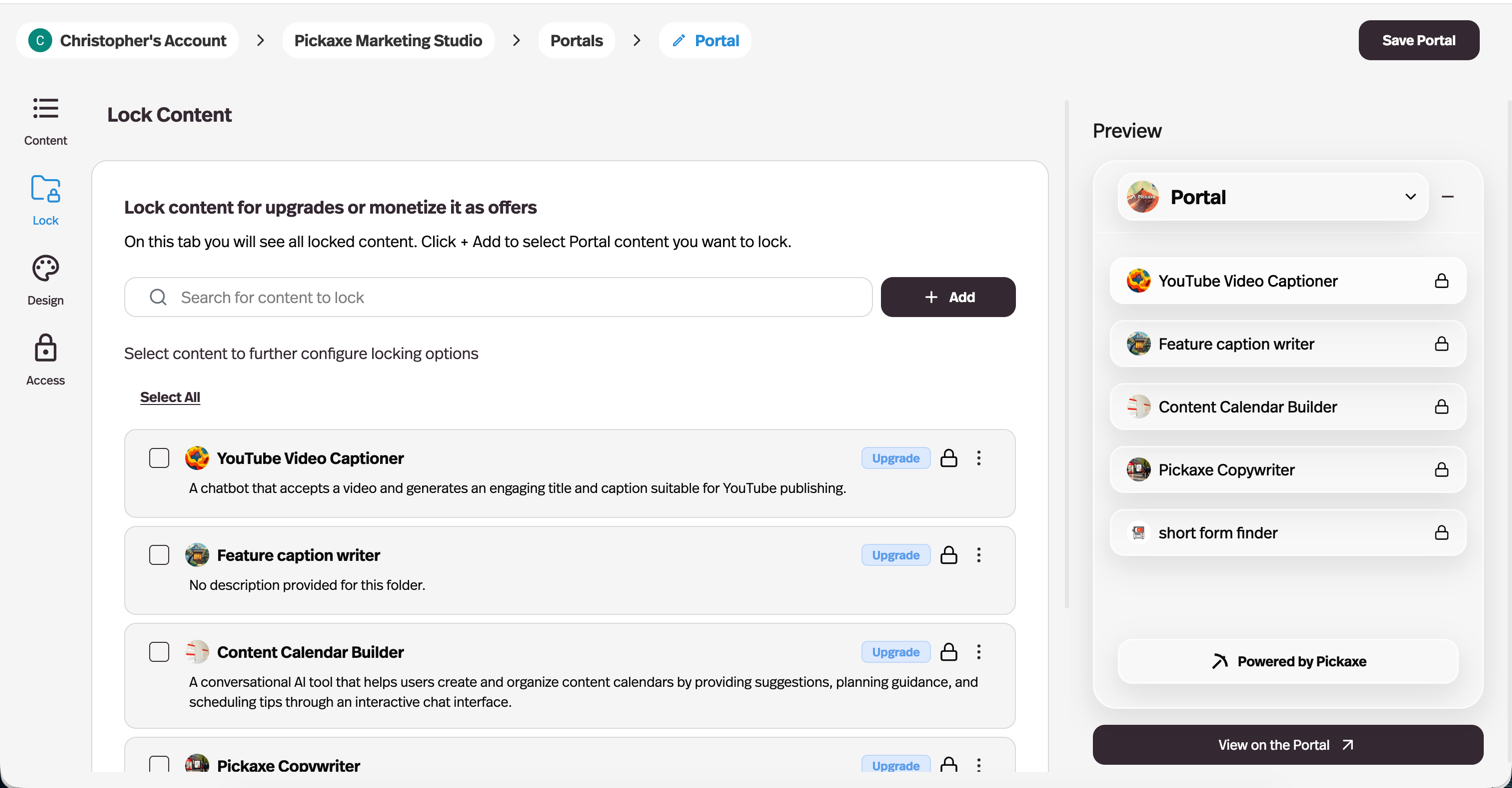
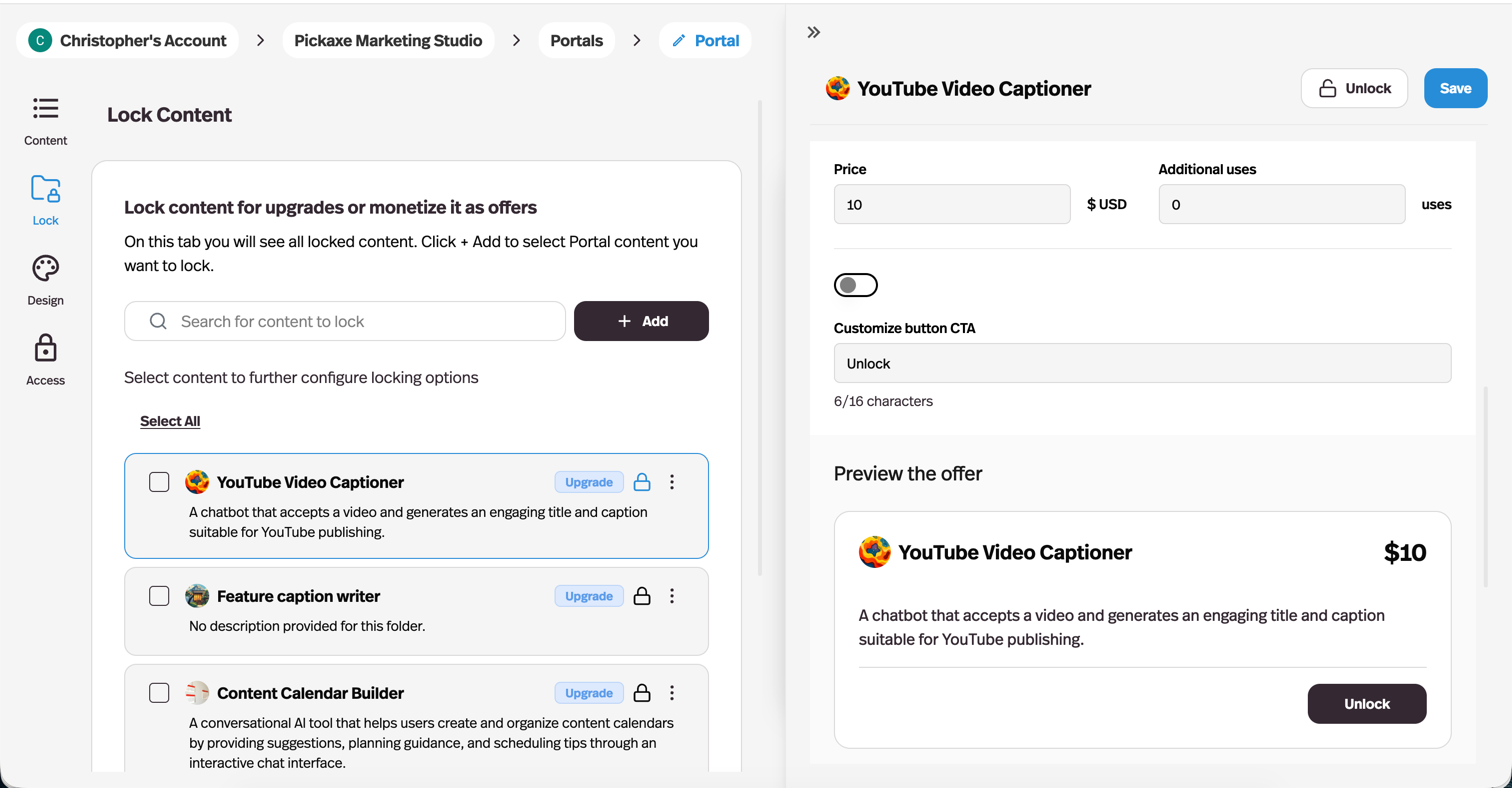
If you want to sell one-off access to a specific tool rather than managing full access group tiers, you can use Offers. Offers let you sell ad-hoc access to individual agents, Pages, or folders of content. They're great for creators who have a variety of products and don't want to spin up a separate Portal or access group for each.
You configure Offers from the Lock tab in the Portal Editor. Pick the agent, Page, or folder you want to gate, choose between an "upgrade preview" or a paid Offer, and set your price.
Take Rates
Pickaxe charges a take rate on payments processed through the platform. The take rate depends on your plan:
- Free — 10%
- Gold — 10%
- Pro — 8%
Managing users
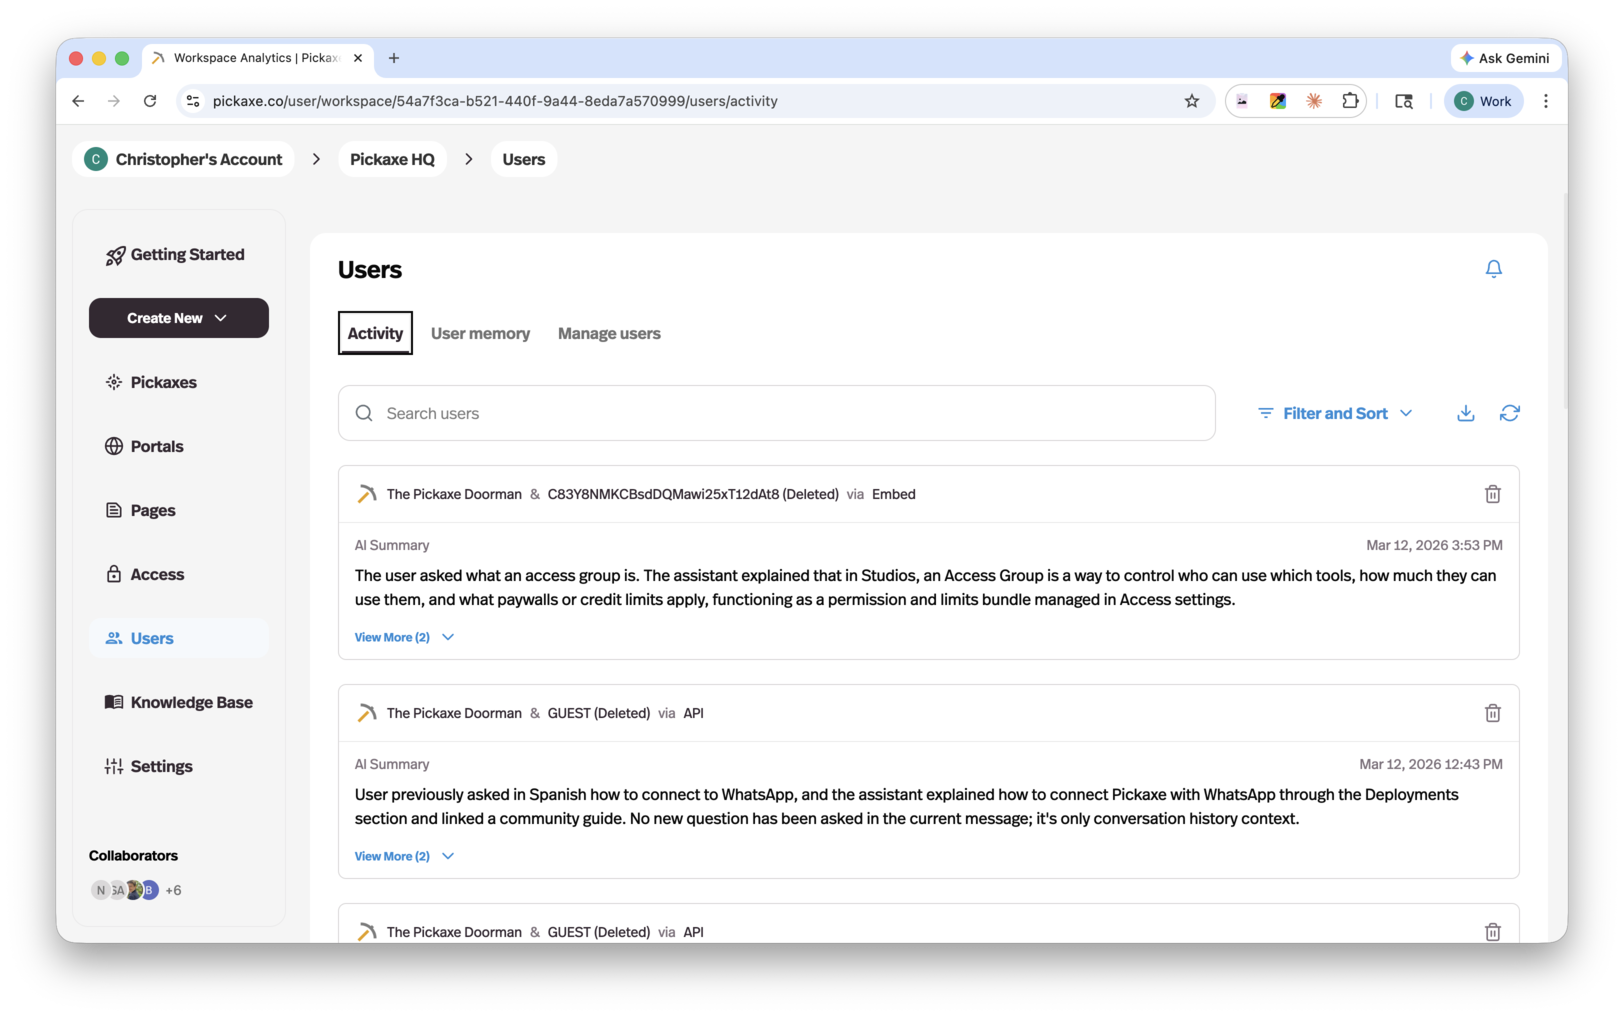
Inside the Users tab of your workspace, you can manage users and monitor activity across all your agents.
Under the Activity tab, you can see usage across your agents. Each conversation has a high-level AI-generated summary. You can click in to see the full conversation if something needs investigating.
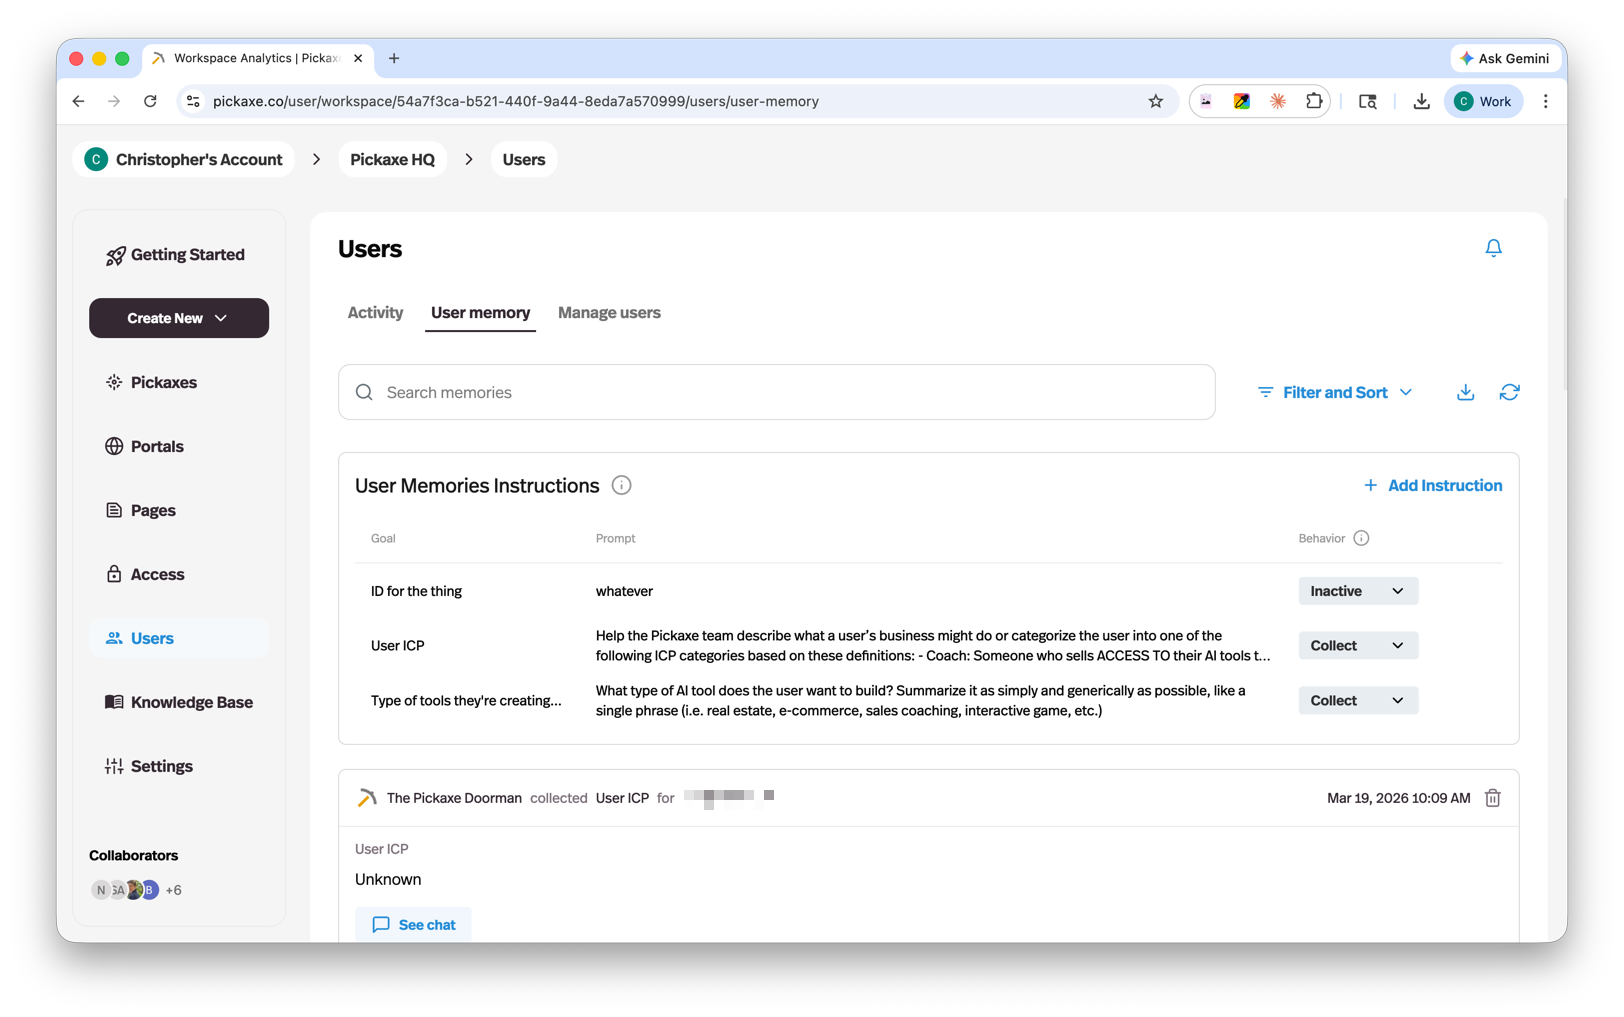
Under the User Memories tab, you can configure traits that your agents will collect and remember about users on a user-by-user basis. This makes the experience more personalized — your agent can remember a user's name, role, preferences, or anything else you tell it to track. You can read more about the User Memory feature here.
Under the Manage Users tab, you can see all your users (including users without accounts, tracked by IP), check usage, and perform admin actions. Clicking on a user brings up a card with their full details. From there, you can grant extra credits, manually assign them to an access group, or invite new users.
Embedding agents
One of the most popular features in Pickaxe is embedding agents into third-party websites. You can drop a slick, white-labeled embed onto your own site (or any site where you can add a script tag) and set basic usage restrictions on it.
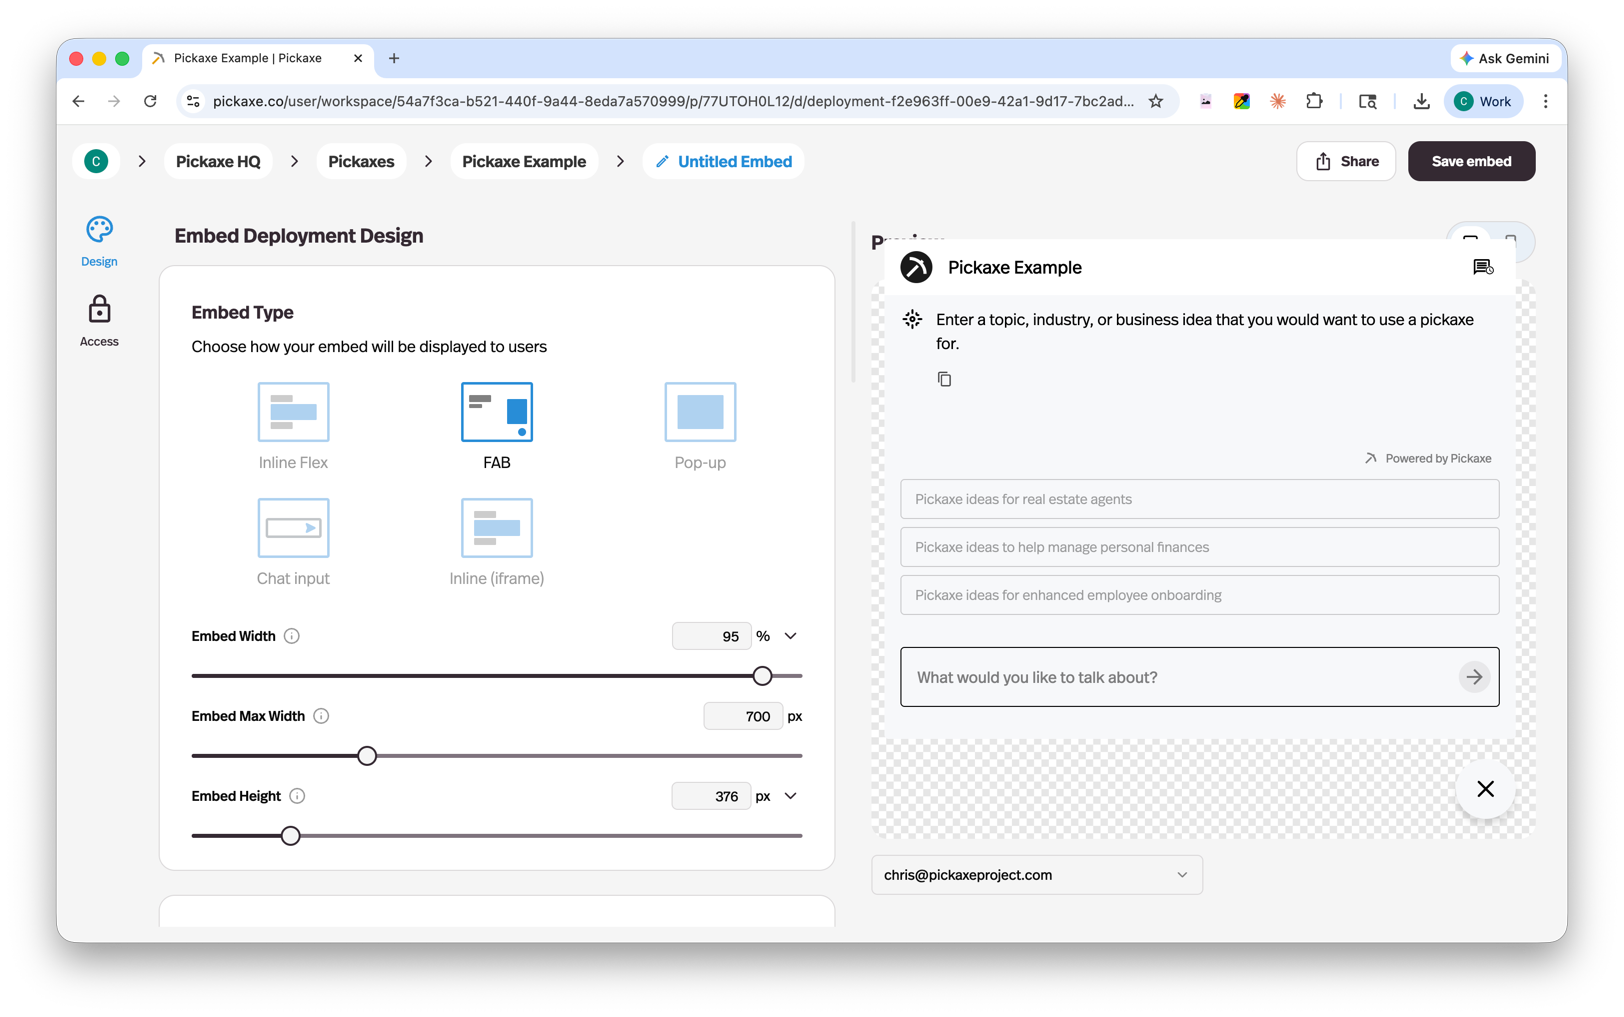
Embed types
Pickaxe offers five embed styles to fit different use cases:
- Inline Flex — A responsive chat interface that sits directly within your page content and adapts to its container.
- FAB (Floating Action Button) — A familiar chatbot button that floats in the corner of the page — the classic chat widget experience.
- Popup from Button — A chat window that opens when a user clicks a button you place on your page.
- Chat Input — A standalone input field you can place anywhere on your page.
- Inline (iframe) — A fixed-size iframe embed for dropping an agent into any page with full isolation.
To create an embed, click on an agent and create a new Embed deployment. This opens the Embed Customization screen, where you can customize font, color, sizing, white-labeling, and embed type, and see a live preview as you go. You can also set a usage limit specific to that embed — when a user hits the limit on a third-party site, they get a custom message that redirects them to a location of your choice.
Once you save an embed, you'll get a code snippet you can copy and paste. If you go back and edit the styling later, you do not need to re-paste the embed code — your changes update in place.
For a full walkthrough, see our guide on embedding AI chatbots into your website.
Deployment overview
Embeds and Portals are two of the most popular ways to ship an agent, but they aren't the only ones. After you build an agent, you can deploy it through any of the following channels — and you can use as many as you want for a single agent. Monetization and access control work consistently across every deployment type, so your billing and permissions stay in sync no matter how someone reaches your agent.
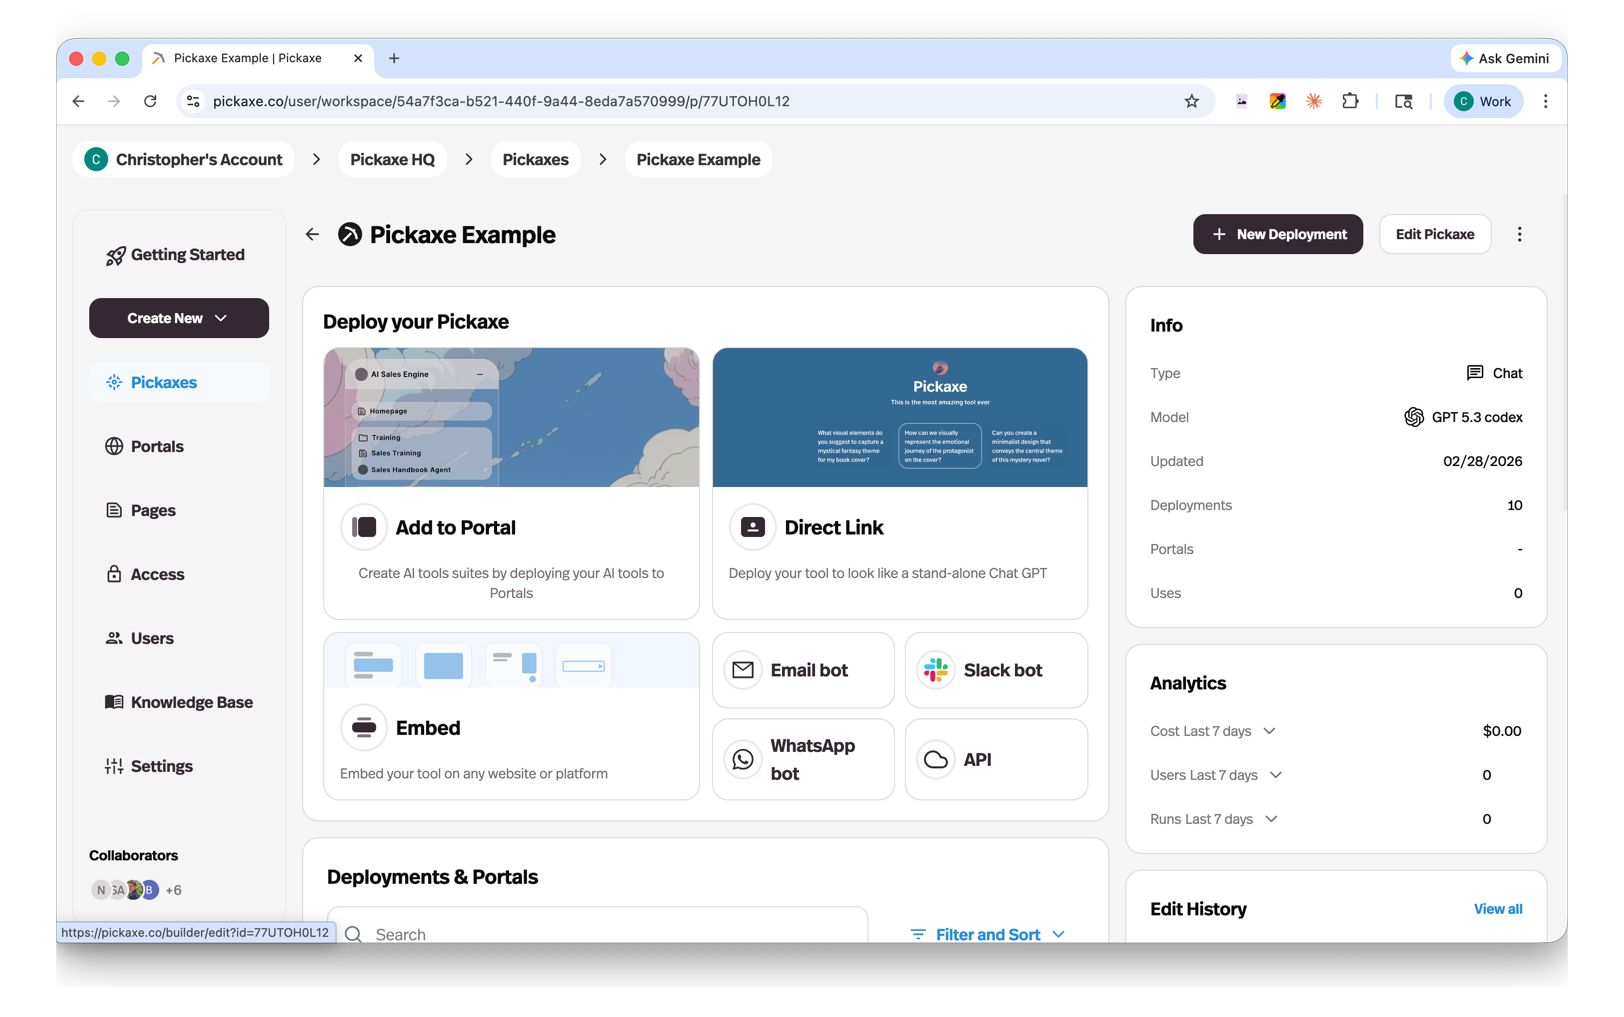
Each deployment type has its own dedicated configuration screen. Here are a few of them at a glance:
- Portals — Branded, multi-agent hubs where users can access one or more of your agents in one place.
- Pages — Standalone web pages for sharing individual agents or collections.
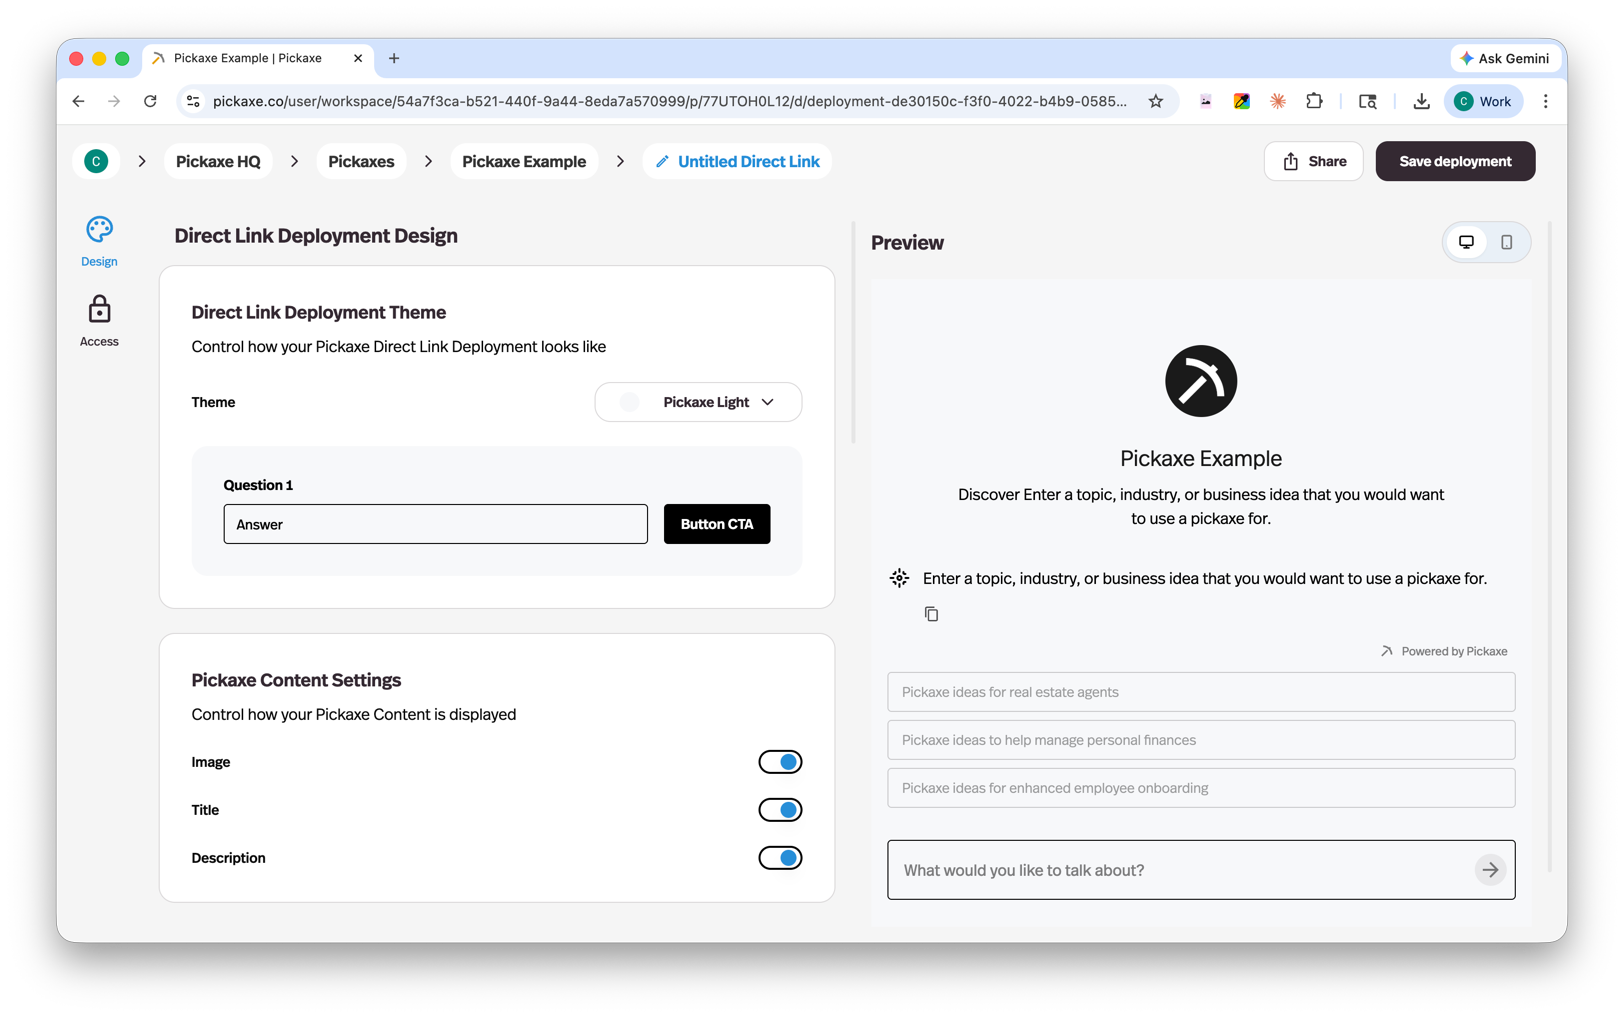
- Direct link — A simple shareable URL that takes users straight to your agent.
- Embeds — Drop your agent into any website as a chat widget or inline embed.
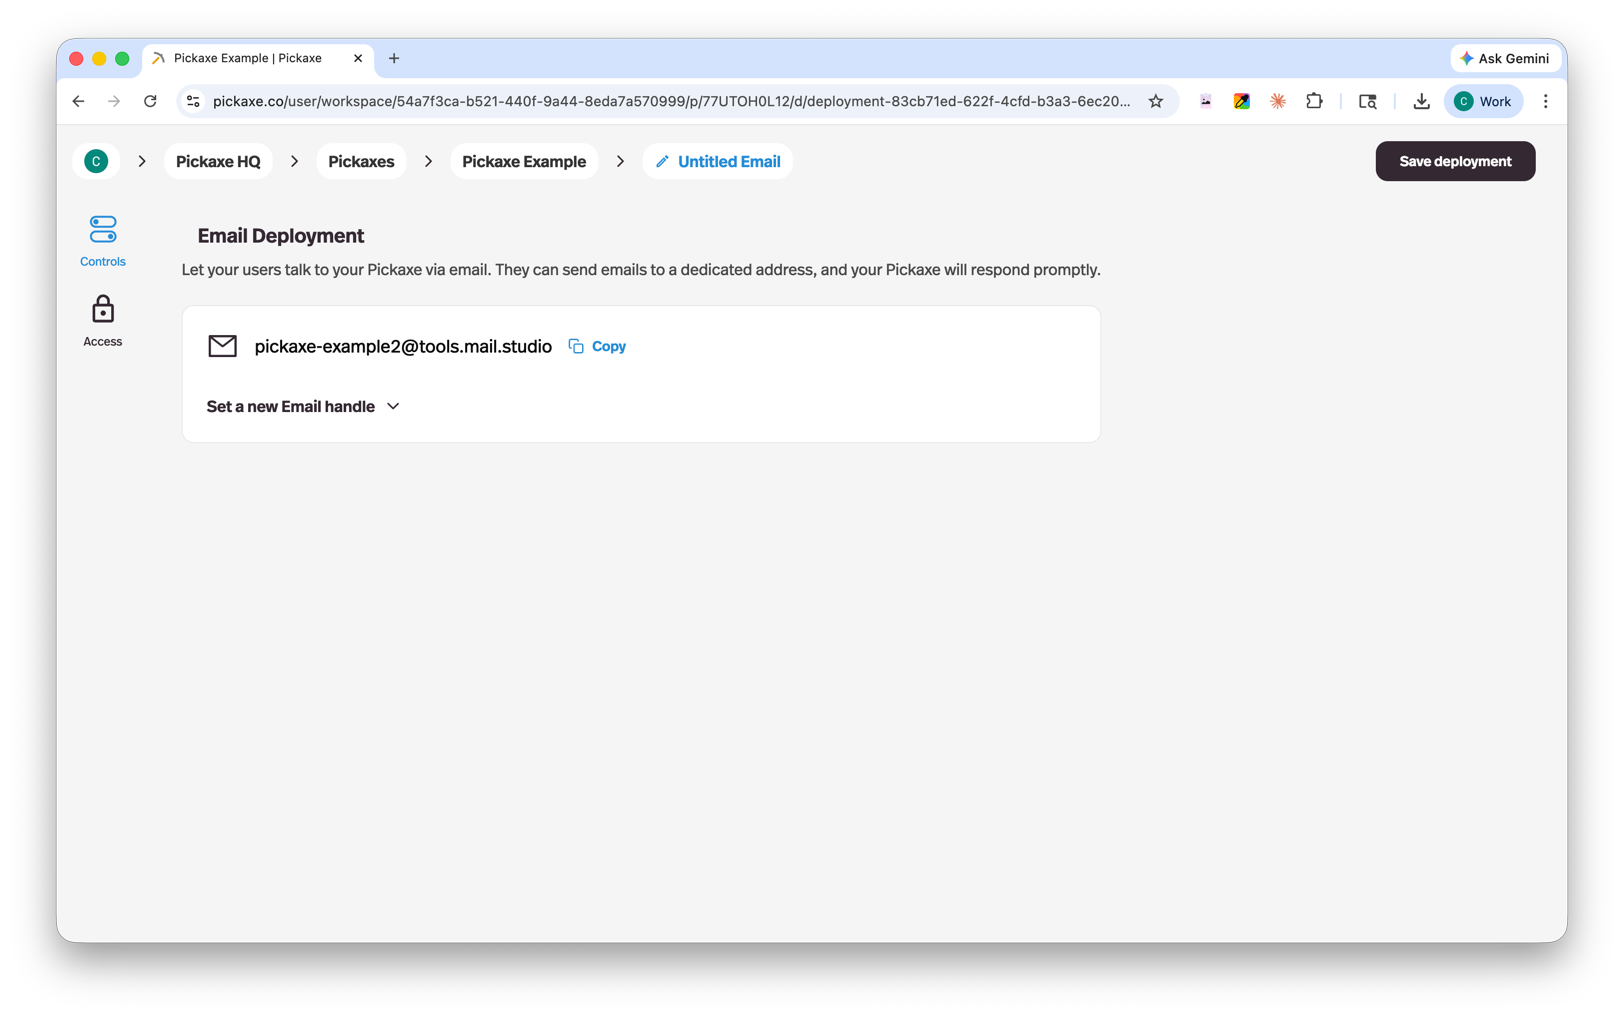
- Email bot — Users interact with your agent by sending and receiving emails.
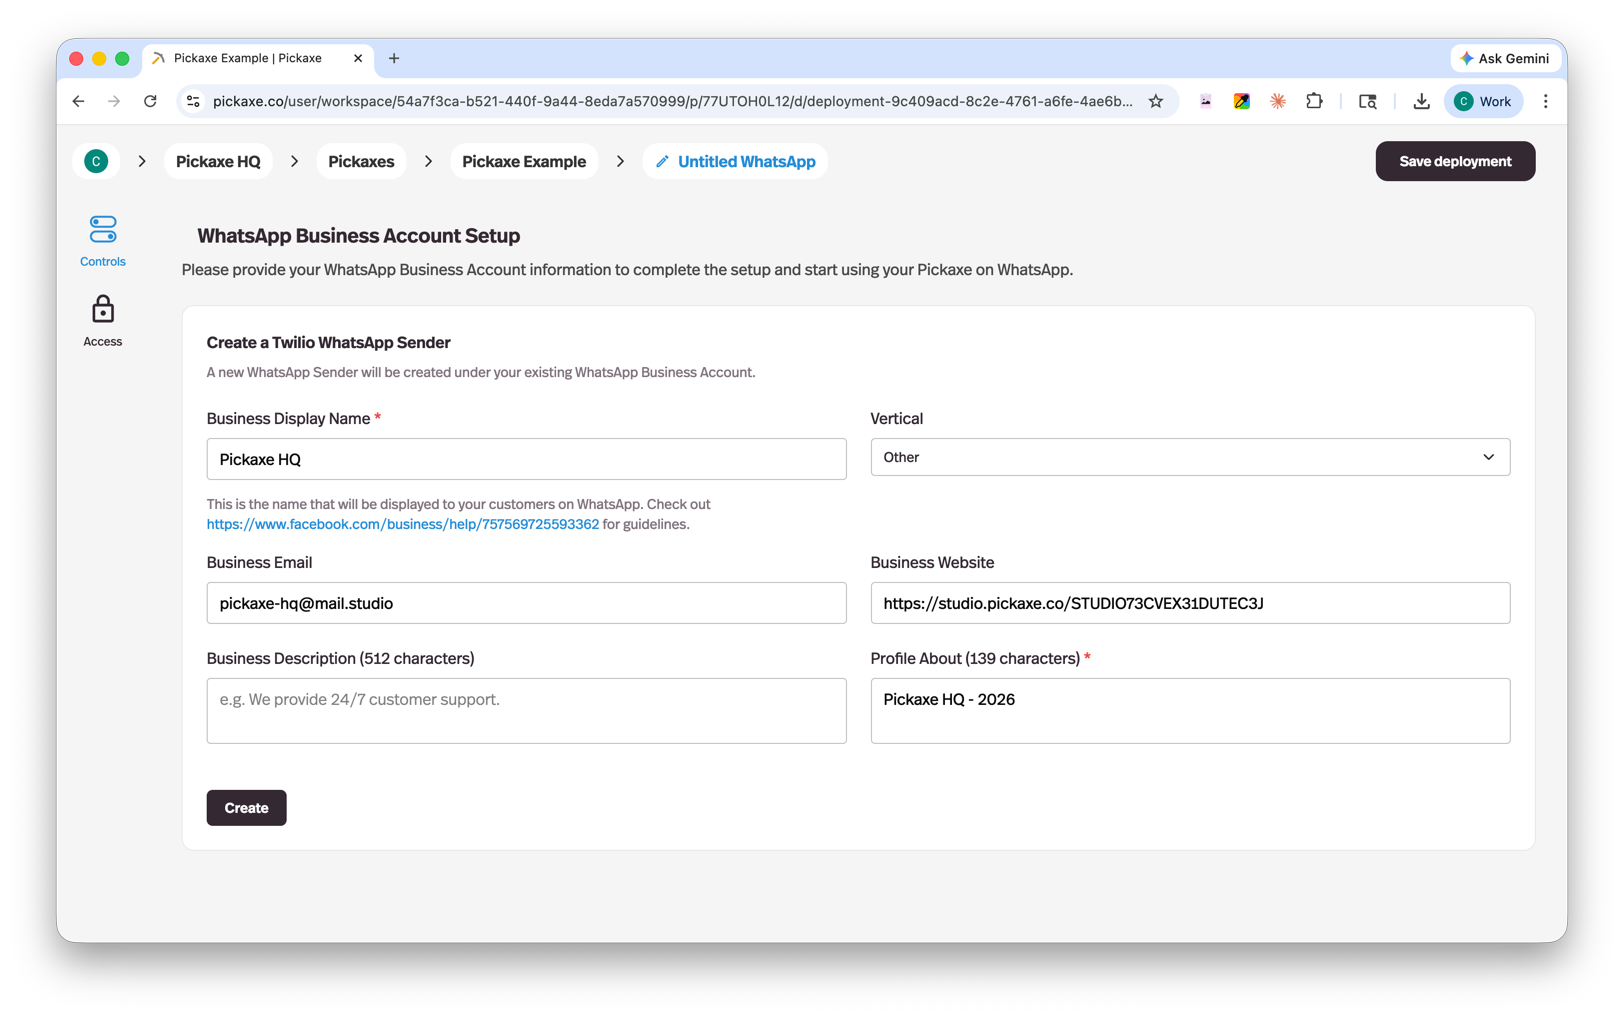
- WhatsApp bot — Connect your agent to WhatsApp so users can chat with it from their phone.
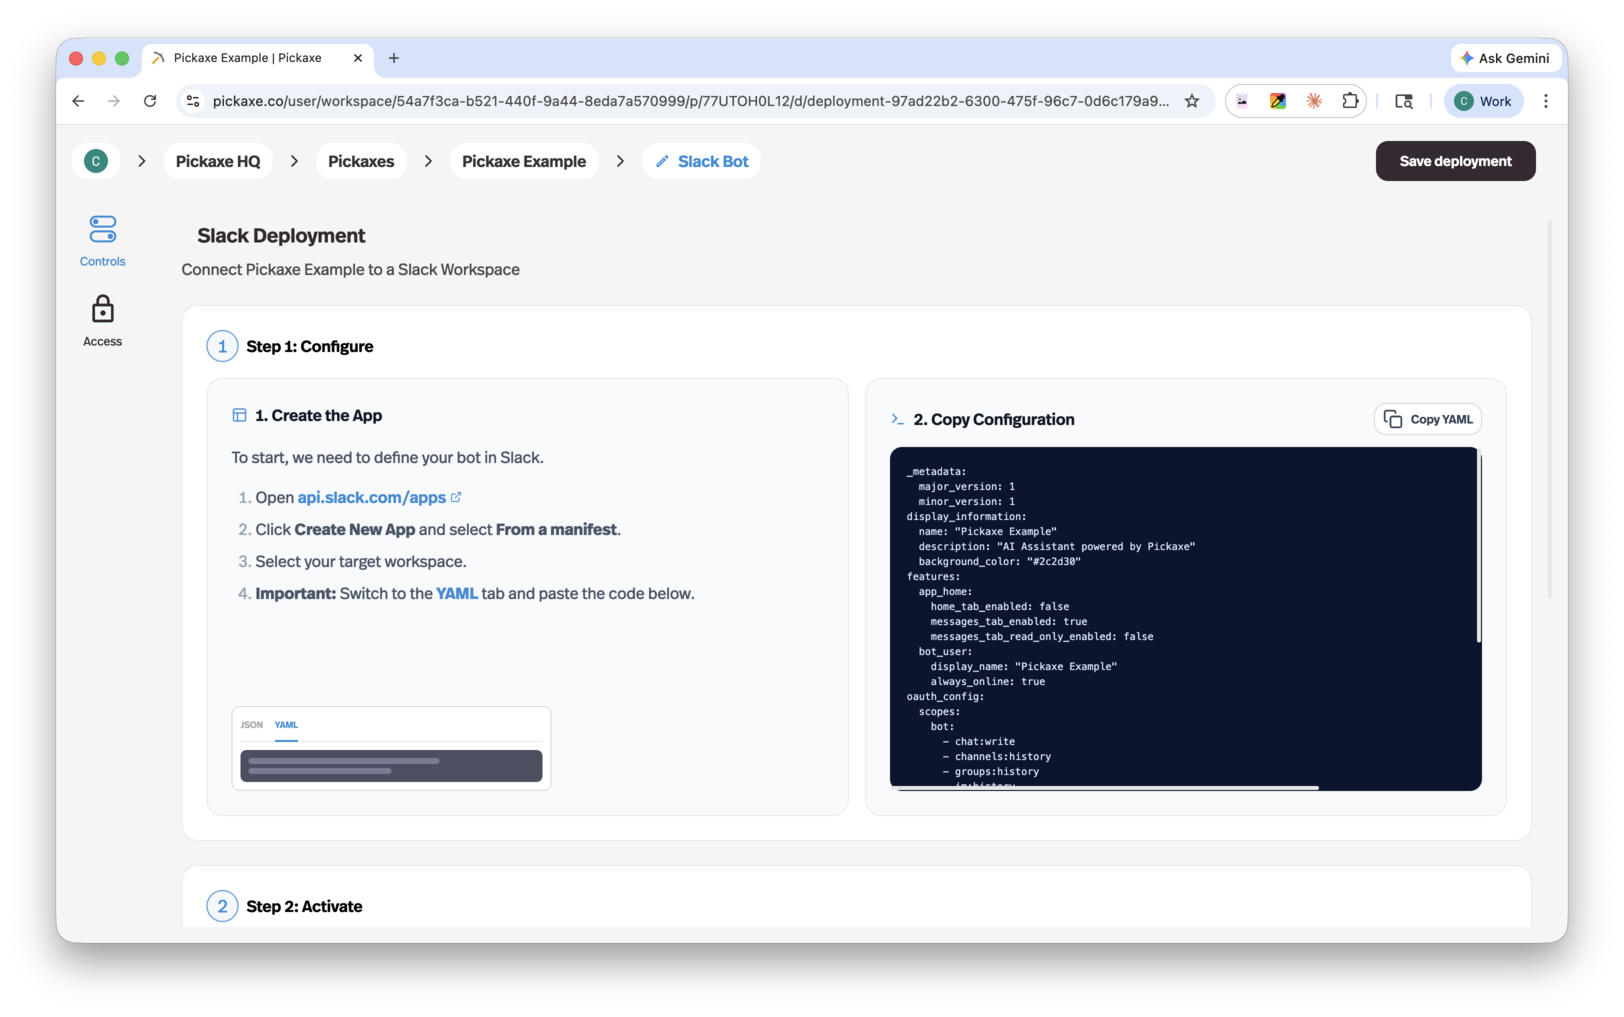
- Slack bot — Add your agent to a Slack workspace so teams can use it directly in their channels.
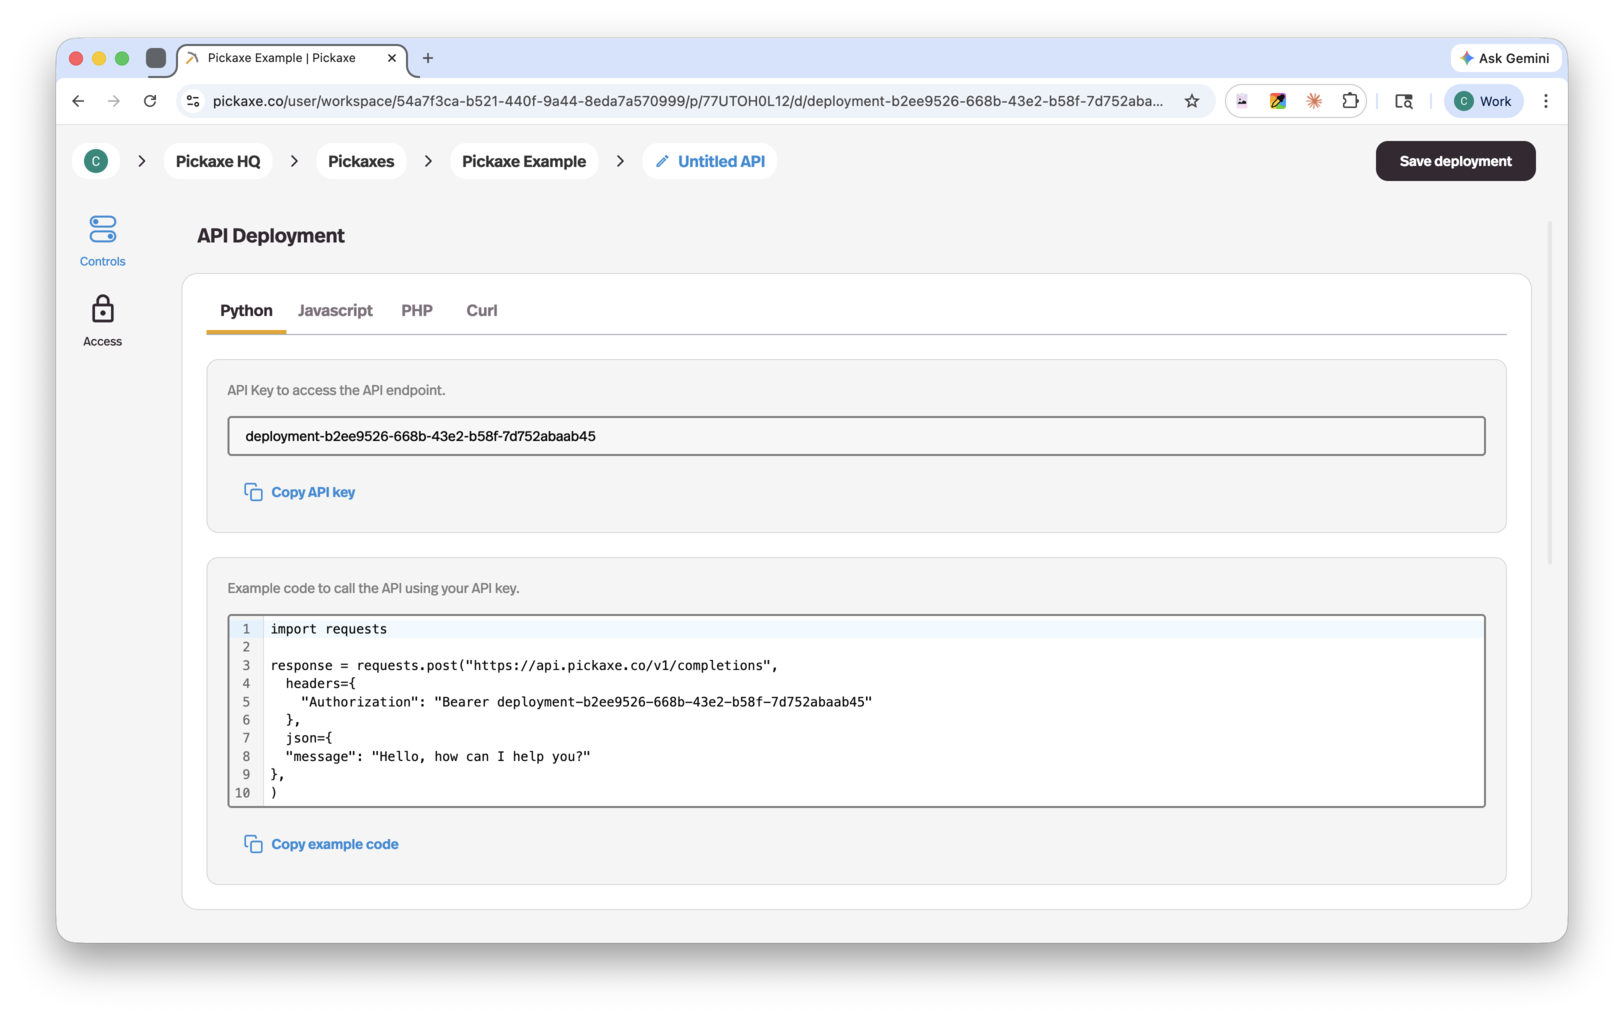
- API — Access your agent programmatically for custom integrations and workflows.
If you're trying to figure out the right channel for a specific use case, our guide on building an FAQ answer bot for a website is a good real-world walkthrough.
OpenClaw — Pickaxe's next-gen AI engine
OpenClaw is Pickaxe's next-generation AI engine. It's currently in beta and replaces the standard backend infrastructure that powers your workspace. When OpenClaw is enabled, every agent in your workspace runs as an independent OpenClaw instance — each end-user gets their own isolated, sandboxed AI agent operating on its own computer.
Think of it as upgrading from a shared environment to dedicated, sandboxed agents with significantly more capabilities out of the box.
What OpenClaw agents can do
OpenClaw agents come with significantly more functionality enabled by default:
- Web browsing — search and browse the web in real time.
- PDF creation — generate documents on the fly during a conversation.
- Code execution — run code directly from the agent's sandboxed computer.
- Computer access — request a link to view and control the agent's computer, allowing you or your users to authenticate accounts, verify actions, or interact with the environment directly.
- Multi-model functionality — leverage multiple models within a single interaction.
- Deeper memory — improved context retention across conversations.
OpenClaw also gives users the ability to rewrite the brains of an agent, with Pickaxe-applied safeguards to keep that flexibility safe.
Enabling OpenClaw
OpenClaw is in beta and requires a quick onboarding call so we can walk through your use case and provision your workspace correctly. Once you're set up, you'll find the OpenClaw AI Engine toggle in your Workspace Settings — flipping it on switches every agent in the workspace over to OpenClaw routing.
All of Pickaxe's standard monetization tools work seamlessly with OpenClaw bots — subscriptions, pay-per-usage, one-time payments, and external links — so you can charge for access just like any other agent.
Still have questions?
That's a tour of Pickaxe, top to bottom. There's plenty more depth in each of these areas — the help docs and community forum go further on every topic.
If you have questions, try asking the Doorman, our chatbot trained on this guide and many other Pickaxe materials. You can also email info@pickaxeproject.com, browse our FAQ, or hop into the community forum. If you'd rather hand the work off entirely, our Custom Support team can build agents with you or for you.
Now go build something.