
Actions Walkthrough Guide
Pickaxe is an easy platform for creating AI chatbots and tools. One of the first things many users want to do with their Pickaxe, is connect it to another piece of software, like Zapier or Make.com. Many usersalso want their Pickaxes to do things beyond generating text and images, like sending the output via email or generating a PDF containing the result.
Large Language Models cannot do these things. LLMs like GPT-4o and Claude 3.5 are simply models that can read and write text. But Pickaxe, through a powerful feature called Actions, can connect these models to external pieces of software. That's what we'll talk about today, Pickaxe's powerful API Actions.
Actions are basically an easy way to teach your Pickaxe how to use other pieces of software on the internet.
In this guide, we’ll give you a step by step walkthrough of how to connect Actions to your tools. If you prefer watching rather than reading, here's a video that offers a basic overview of connecting existing Actions to your Pickaxe.
First, let’s quickly explain what an Action is.
What is an Action
An Action is a connection to another piece of software (i.e. Zapier, Mailchimp, ElevenLabs) that has been configured in a way where your Pickaxe can reliably use it when contextually appropriate.
The Action has some code under the hood, but all of this is hidden from both you and from your Pickaxe. You can think of it as a simple button that your Pickaxe can press when appropriate.
How does it know when to use an Action? Or how to use an Action? You explain in simple, plain language. Just like a prompt. Consider it a branch of prompt engineering.
Your Pickaxe can also pass information to through an Action (like an email address or a summary of the conversation). Your Pickaxe can also receive information back from an action (like an image or results from a query)
Understanding Examples of Actions
Before we jump into setting up an Action, let’s clarify what Actions can do. Let's go over three examples.
Slack Action: This Action lets your Pickaxe send a message to a predetermined Slack channel. The Slack channel where it sends a message to would be set up beforehand by the owner. The information it sends to the Slack channel would be defined when you set up the Action. And the trigger for when it sends information to the Slack channel would be also be defined by you as well (i.e. every time a certain subject it mentioned, or anytime the user says they want to contact support).
Send Email to Owner: This Action sends an email to you. When you configure the action you would determine where it sends the email (i.e. ian@example.com), when it sends the email, and what's in the email.
DALL-E Action: This Action sends a request to DALL-E 3 and then returns an image that DALL-E generates into the chat.. When you configure this action you would add some details about how you want the image to look and you would also enter your OpenAI API key.
Step 1: Open the Act Tab
For all actions, the first step is to open up the Act tab of the builder.

In this tab, you can all the Actions currently connected to your Pickaxe, browse existing Actions, connect new Actions, and even build your own custom Action.
First, we'll focus on how to connect an existing Action to your Pickaxe.
Step 2: Connecting a New Action
Let’s go over connecting our first Action. Let’s use the example of an Action that sends an email to the owner.
First, you'll browse the "Community Actions" section of the page. These are Actions that already been built, meaning someone else wrote all the code to set it up. But don't worry, you can still customize it to fit your situation. You'll get a chance to do that shortly.
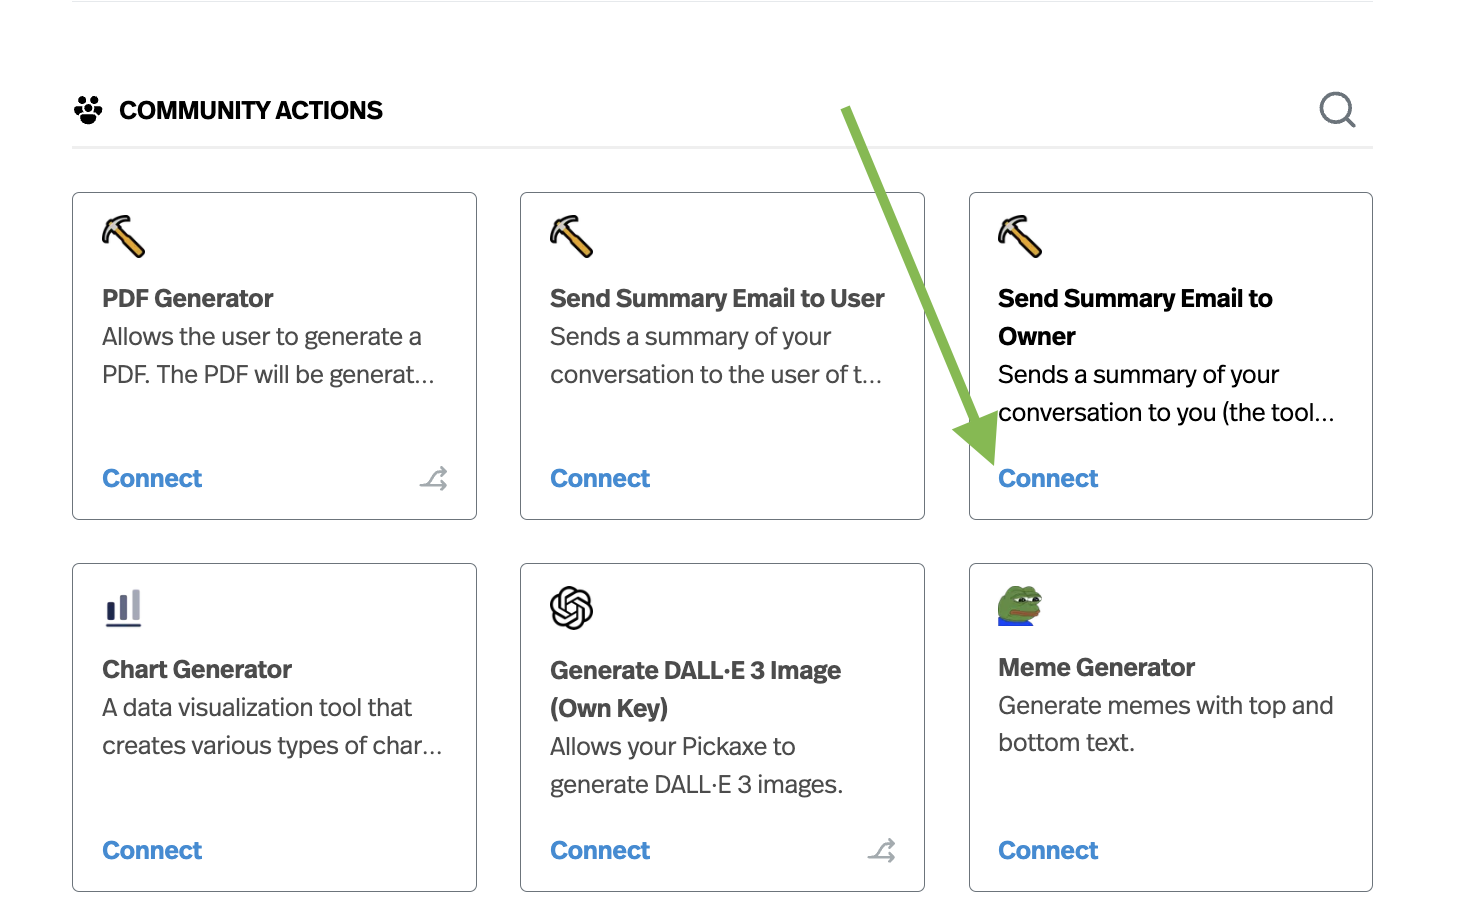
Look for the Action you want to connect. In this case, we're looking for Sends Summary Email to Owner. Then click "connect".
Next you'll see a pop-up window that asks a few questions. This window is where we configure the action to work the way we want. In this case, we want specify where the Actions sends an email to, the name of the tool, and what it includes in the email.
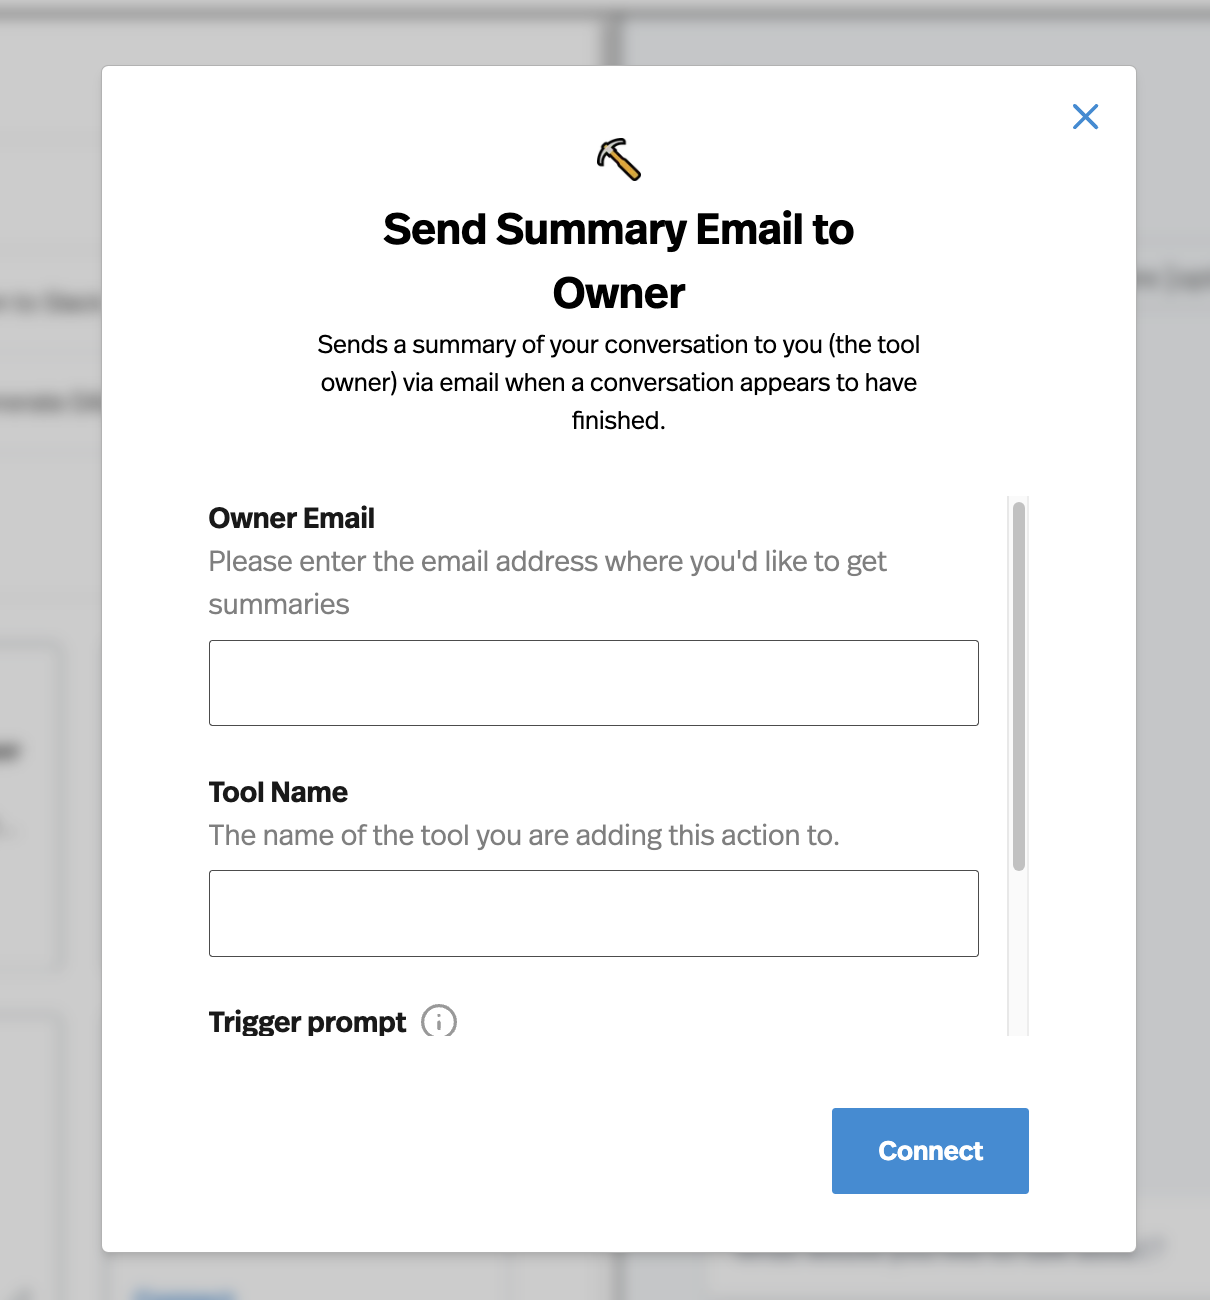
Each Action has a slightly different pop-up window. Some ask for a lot details, like API key and webhooks. Others have almost nothing!
In this case we’ll put in the email address of wherever we want the summaries to be sent.
For Tool Name, we'll just put the name of the tool. This field helps me stay organized, so that when I get an email, I'll know what tool triggered the email.
Finally, there is a trigger prompt. This is a very important field. It is basically the instructions to your Pickaxe about when and how to use the Action. In this box, you can write, in natural language, some brief instructions about the Action.
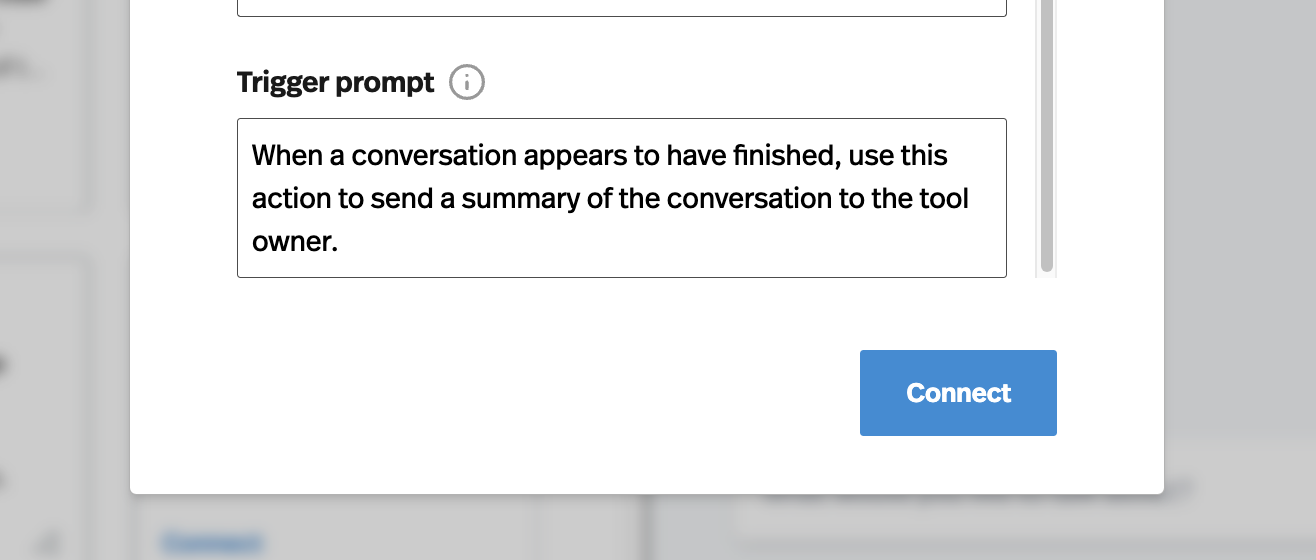
In the Trigger Prompt, we’ll specify that we want the action to send a summary of the conversation. It’s important to note we could change this to whatever we want. We could have it send a summary, send a mood assessment of the user, even send a report on whether the customer is warm or cold lead. Your Pickaxe will look at these instructions before using the action and will follow them, so you can write the same way you would write a prompt.
In this case, we’ll keep it simple. Just a summary.
After you've filled out all the fields, simply click Connect.
Step 3: Testing the Actions
Now that we connected the Action. Let’s test it! Simply use the chat in the right side of the builder.
You’ll always know an Action is running when you see this spinning circle. When you see that spinning circle, that means that the Pickaxe has decided to use an Action and is waiting for the result.

If you've connectex more than one Action and can't tell which Action ran, you can always click on the magnifying glass underneath response. This will bring up a pop-up that contains message insights about the response including token counts, Knowledge Base citations, and any Actions used!
Step 4: Editing Actions
If the result isn’t quite what you expected you can edit the Actions and modify how it behaves. Maybe the email summary missed key information. Or maybe the Action did not trigger when you wanted it to.
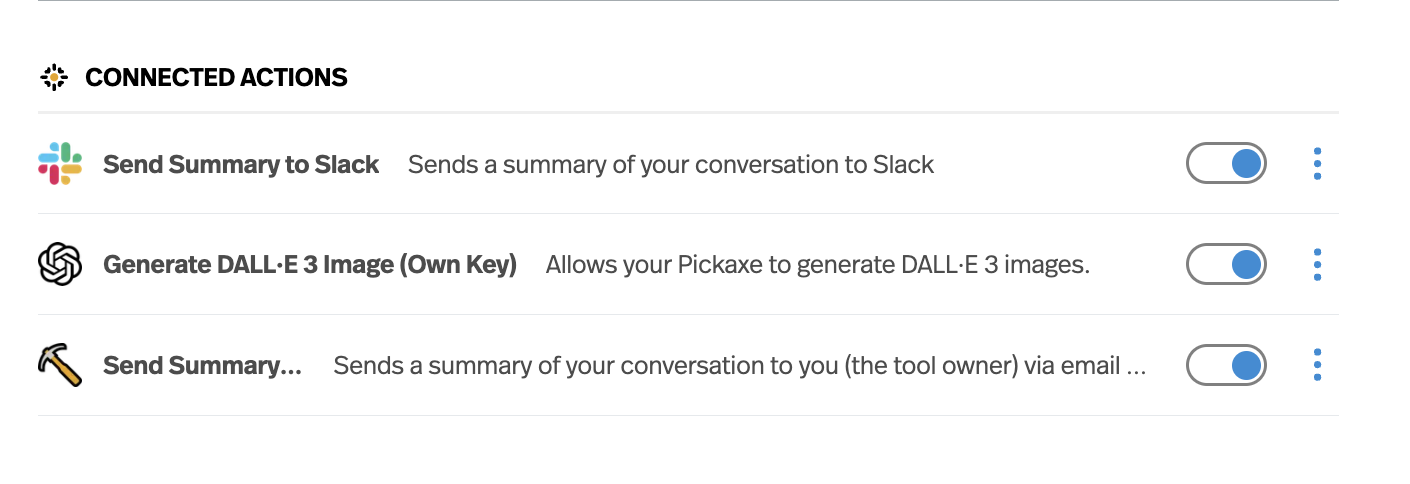
To edit the configurations of an Action, go into the “Act” tab, look at your connected Actions, and click the three dots and click “Edit”.
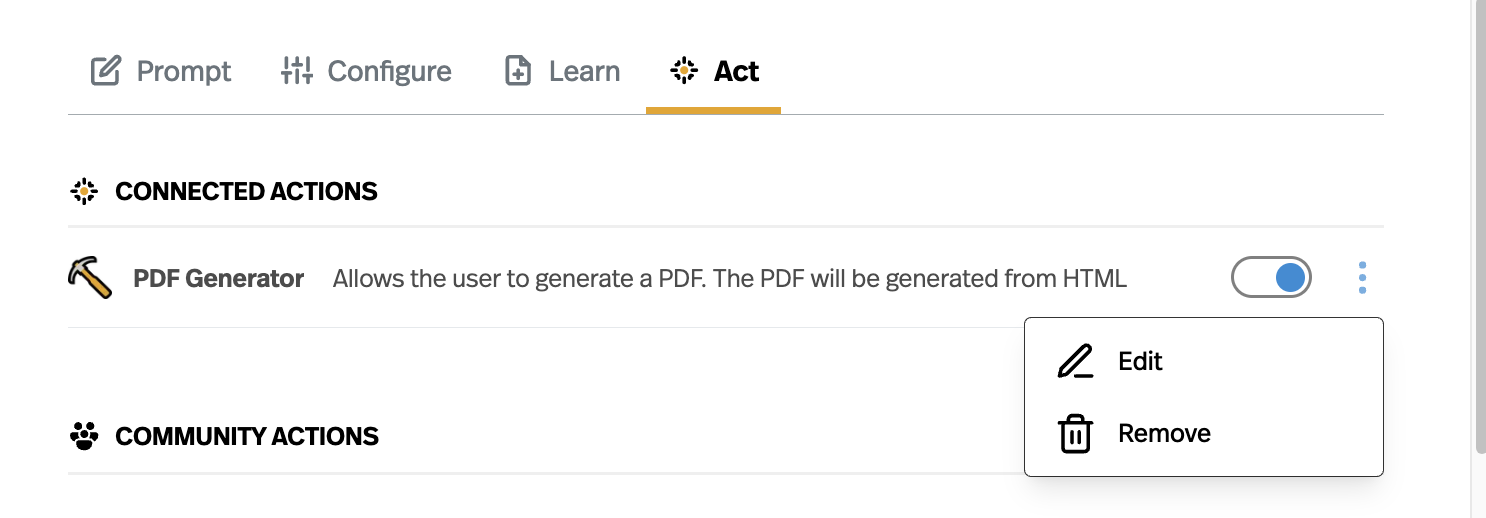
This will allow you to edit all the configurations you made when you first connected it. If an Action isn't behaving quite how you want, usually the culprit is in the Trigger Prompt section. We recommend looking there first.
Step 5: Connecting Multiple Actions
You can connect even multiple Actions to a single Pickaxe. You can always see what Actions are connected to your tool in the “Act” tab. Free accounts are limited to one connection per, Gold accounts are limited to two connections per tool, and Pro accounts can have unlimited connections. You can always remove an Action.
Step 6: Creating your own Action (ADVANCED)
Pickaxe has many existing Actions to offer and we’re adding more Actions all the time. You can browse them in the Act tab and search for specific actions. These are easy to set up because we've already built the code part. All you have to do is fill in some form fields to personalize the Action to yourself.
But oftentimes you may want to build your own Action. Pickaxe supports this through our custom Action builder.
To build your own Action from scratch, scroll to the bottom of the page and look for the Build new action button. Click this to get started!
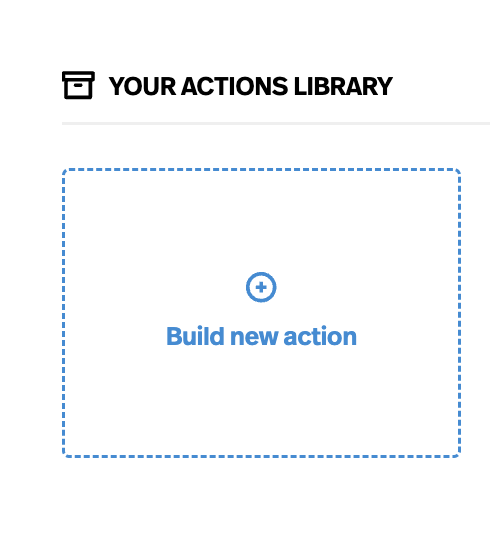
Next a pop-up will appear that lets you create your own Action. This tutorial video walks you through how to build your own Action from scratch.
Conclusion
And there you have it! With these steps, you've unlocked the ability to utilize Actions in your Pickaxe chatbots, enhancing their functionality and interactivity. Whether it's sending messages to Slack, generating images, or creating PDFs, you now have the tools to create a more dynamic chatbot experience.
Give it a try, and let your creativity flow! If you have any questions or need further assistance, feel free to ask. Happy bot building!


.png)
.png)